
Mitasu for Apparel
User Manual
How to use Mitasu for Apparel. Pick a category on the left and open any item to see step-by-step instructions with screenshots.
Getting started
You can start right after installing. First, learn the plans, then place the block on your product page once.
What happens when you install
On install, the app automatically prepares where your product info is stored, and you can start from samples right away — no complex setup.
- Opening the app shows the Dashboard.
- Follow the setup-guide steps.
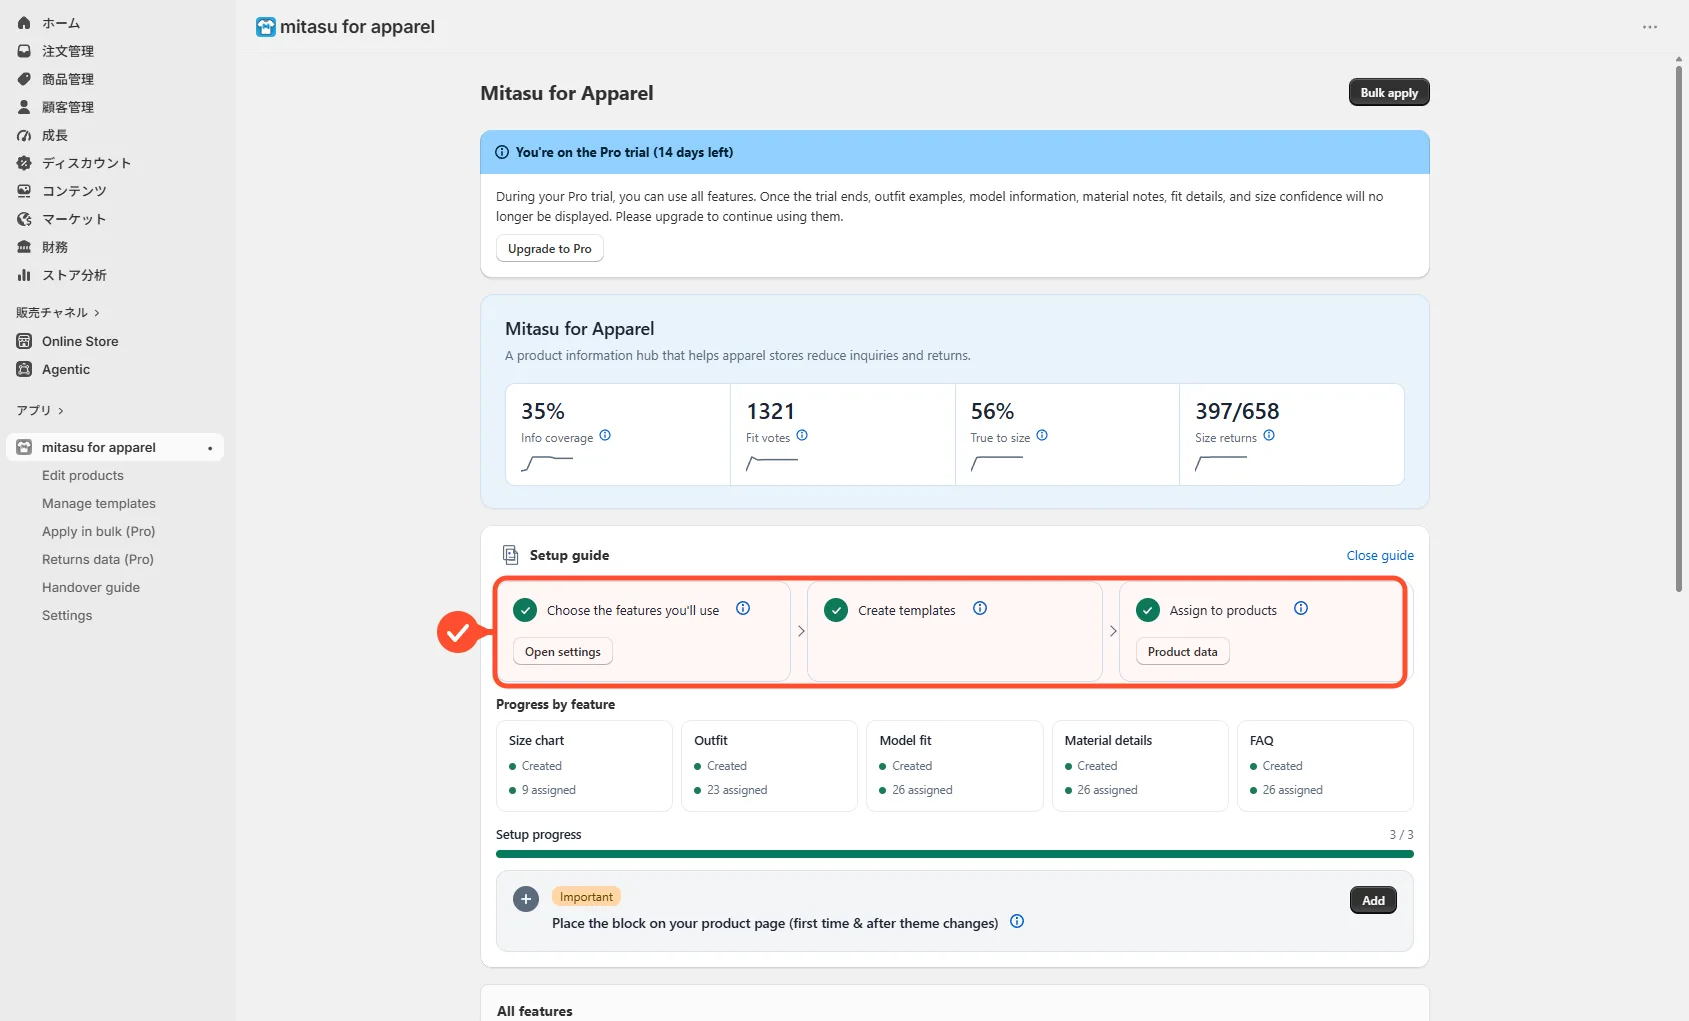
Plans and free trial
The basics (size charts, product attributes, Q&A) are free forever. Model fit, material notes, outfits, fit voting and size confidence — plus bulk assign, CSV import and insights — are Pro. From day one you get a 30-day free Pro trial (it reverts to Free automatically, with no surprise charge).
To move to Pro, use the black "Upgrade to Pro" button shown in the image below (or the "Switch to annual" button just beneath it for yearly billing).
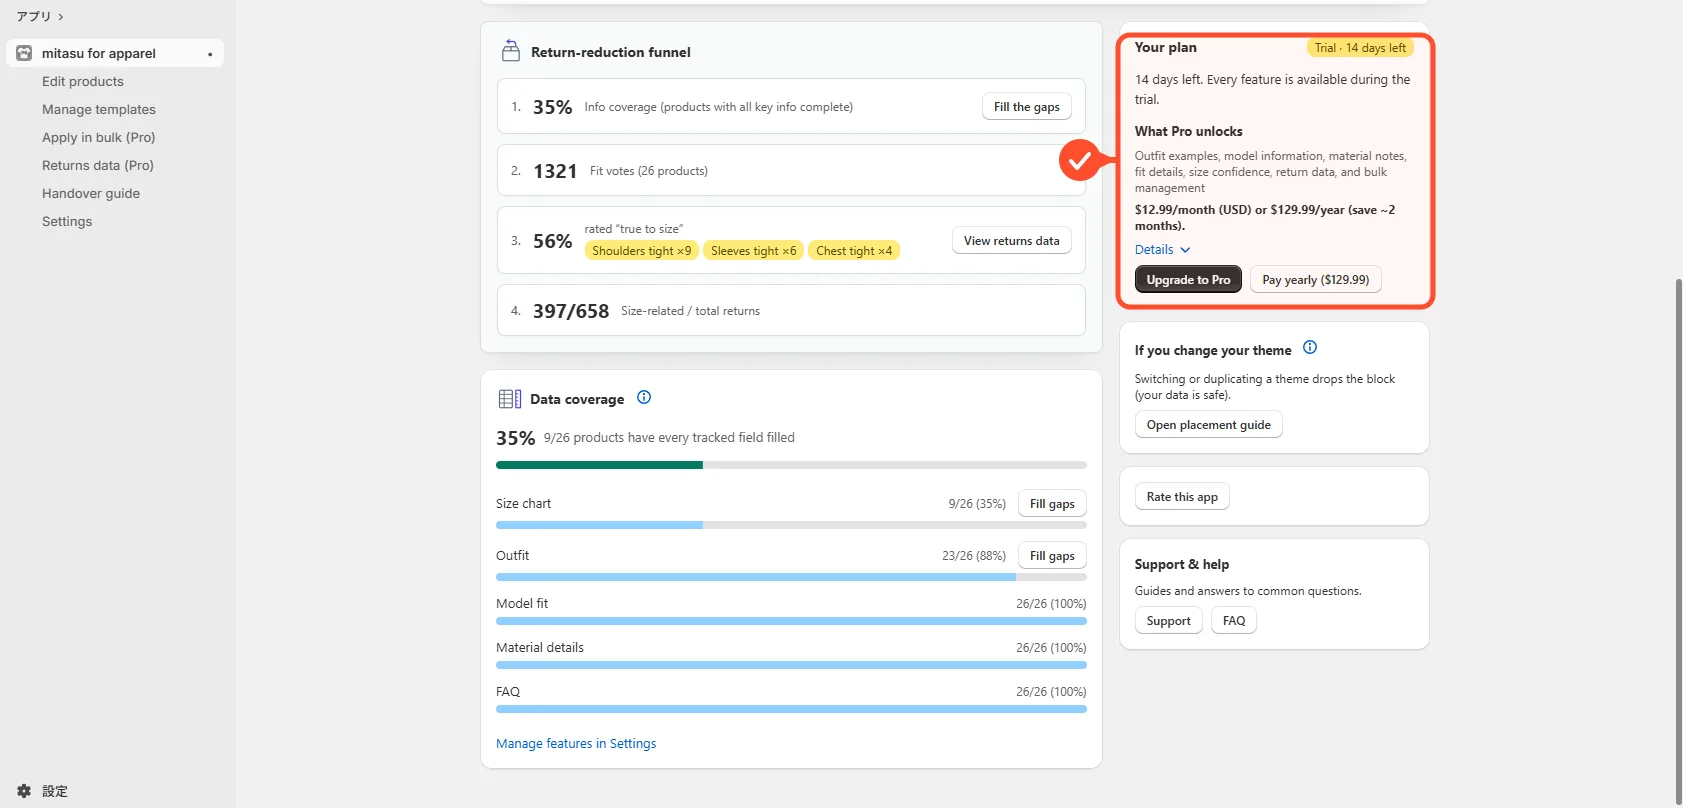
Place the block on your product page
In the theme editor, add the app block "Size and product details" to your product page once. From then on, whatever you assign appears automatically — no per-visit setup.
- Open Online Store → Themes → Customize.
- Select the product page template.
- Add block → "Size and product details", position it, and save.
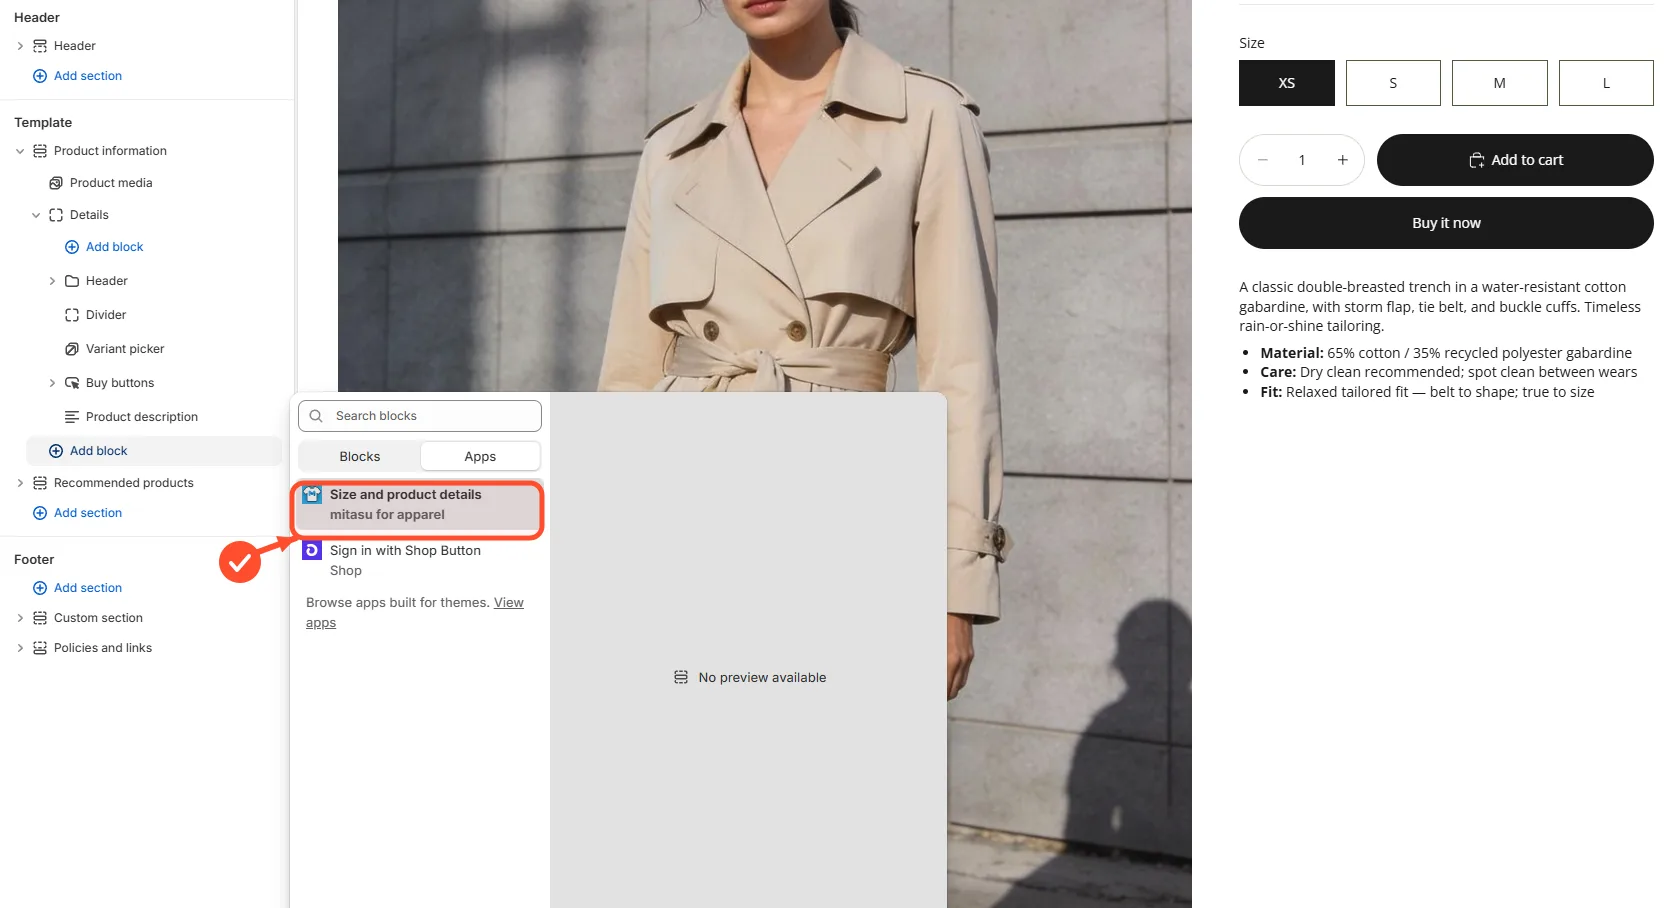
Dashboard
The screen you see first when you open the app — everything else starts from here.
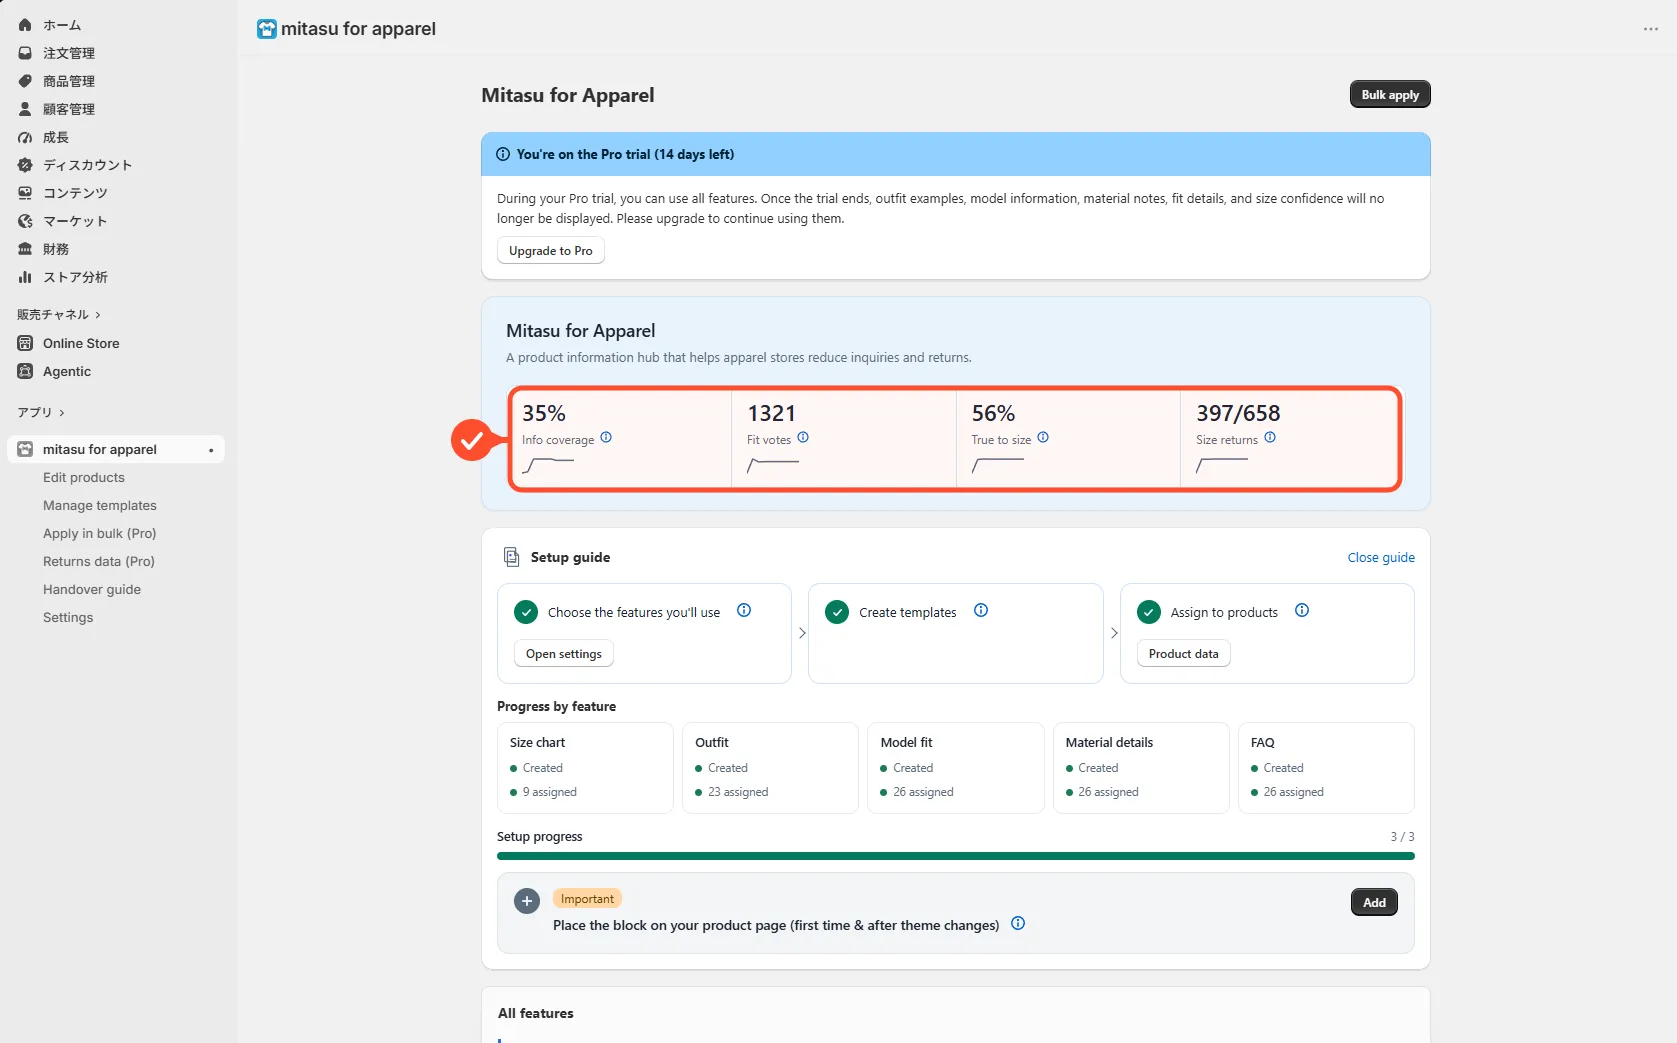
Progress and the returns-reduction view
The Dashboard brings together your setup progress, the returns-reduction funnel, and what to do next.
The setup guide is the only onboarding here — completed steps get checked off, and you can show or hide it yourself once you no longer need it.
Size charts & fit finder
Build a size chart for each product, and show a measurement figure plus a fit finder (size suggestion) on the storefront.
Create a size chart from a template Free
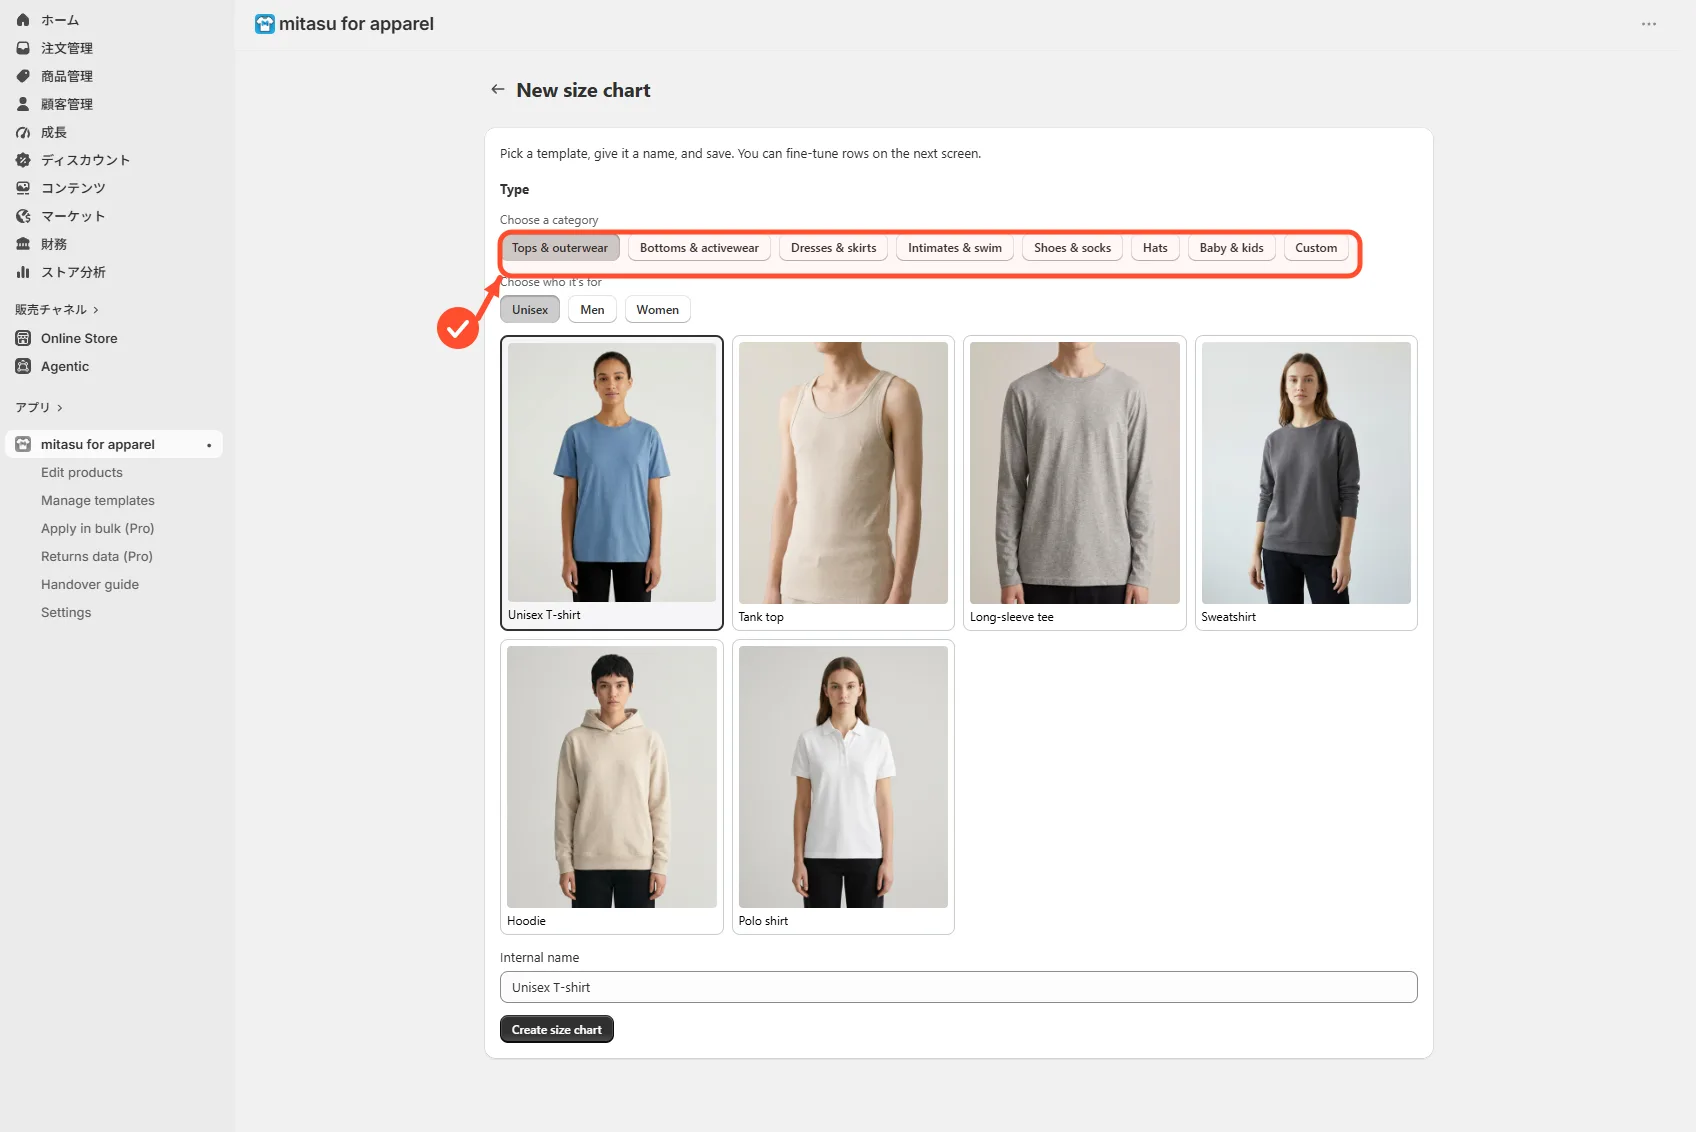
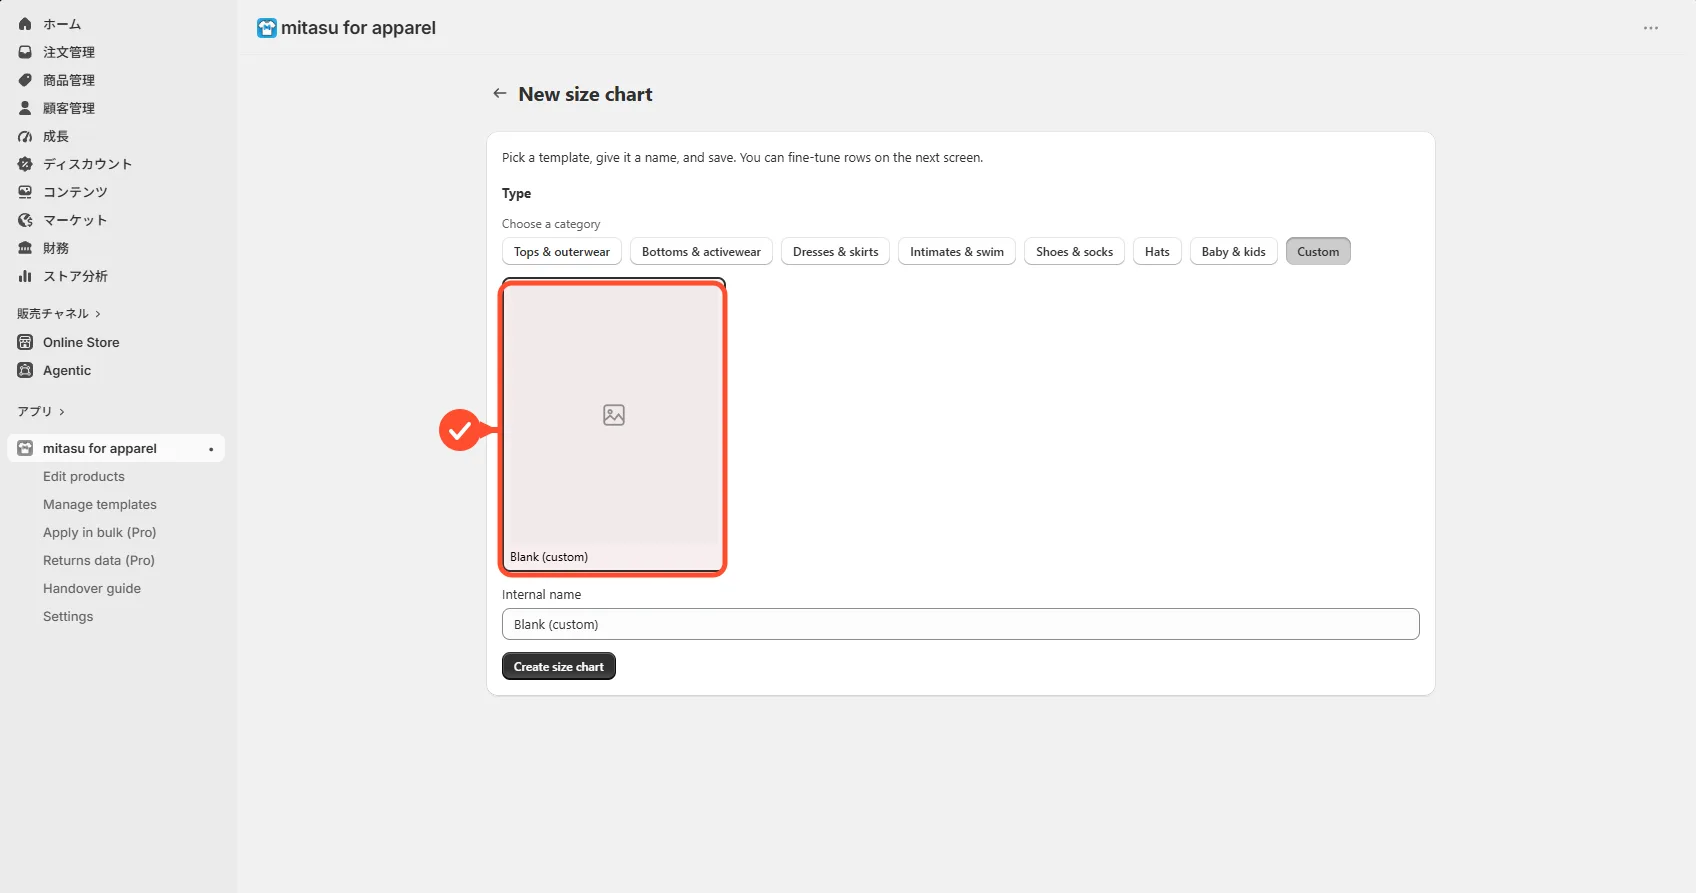
Build a size chart by choosing from a gallery of 68 ready-made templates plus 1 blank (custom) template, organized into 8 groups.
- Open Size charts and open the template gallery.
- Pick the closest group, then the template that matches your product.
- Check the numbers, adjust if needed, and save.
You enter values in the unit set in Settings (inch for US stores, cm elsewhere by default), and they are always stored internally in cm.
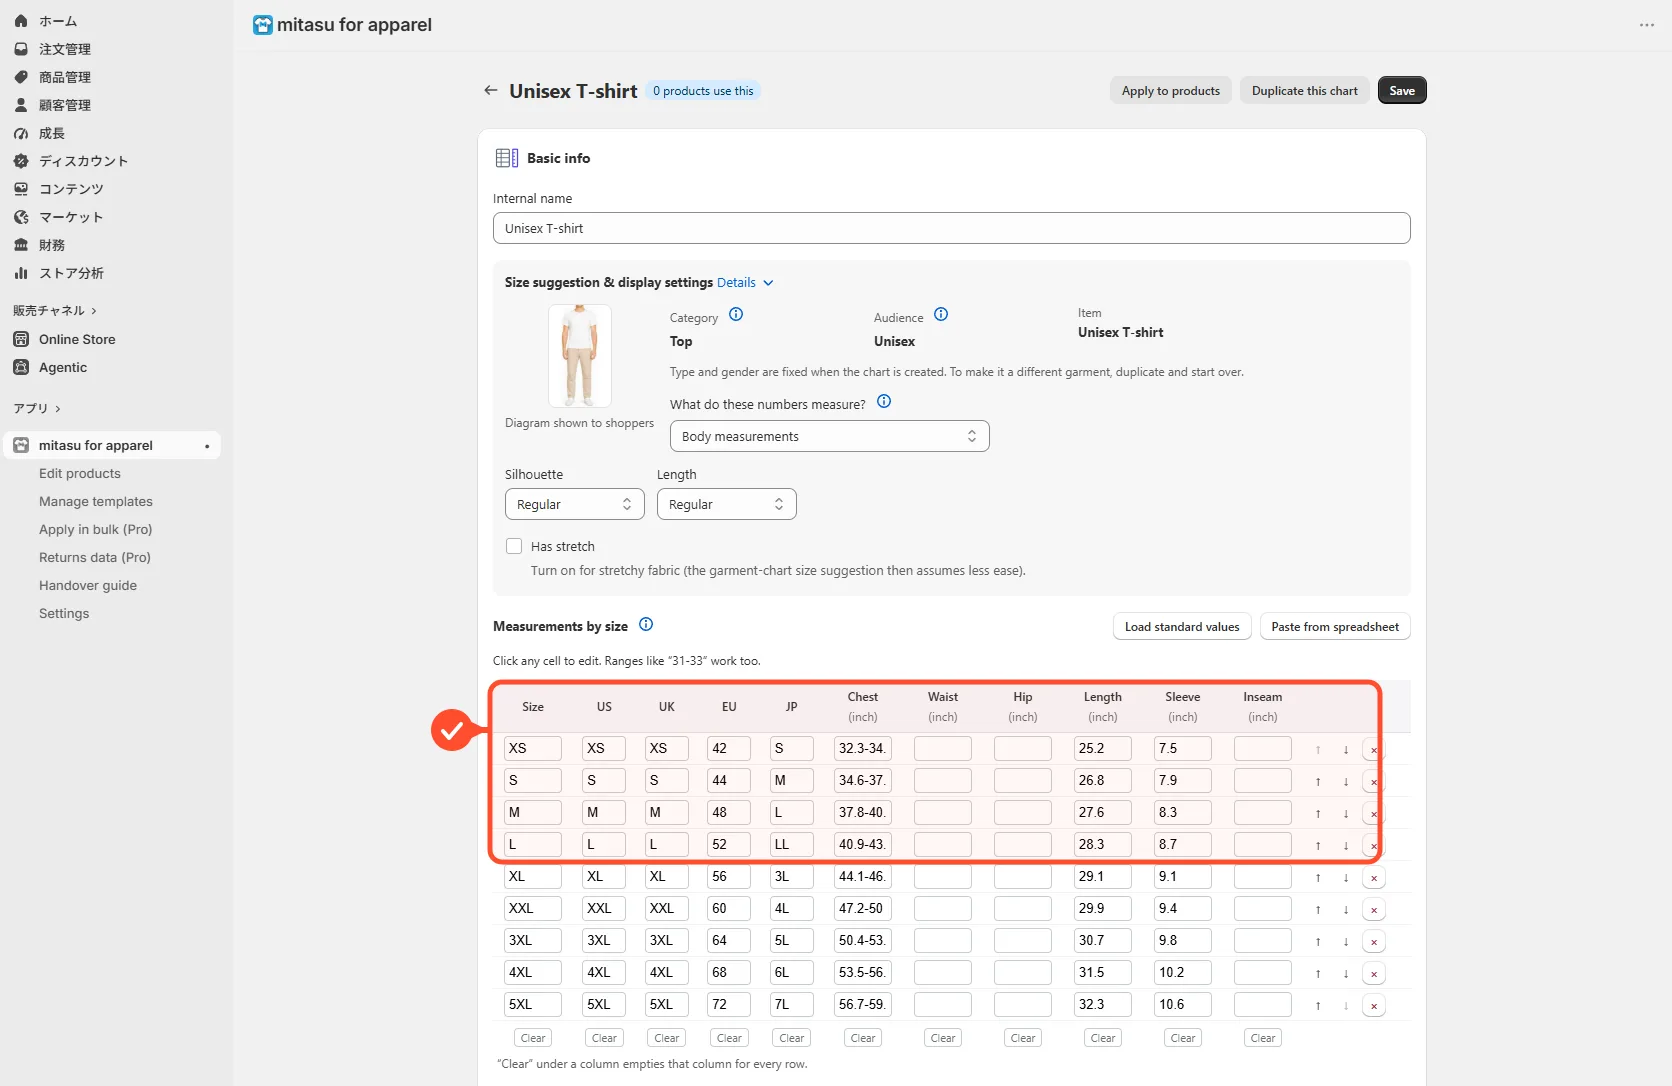
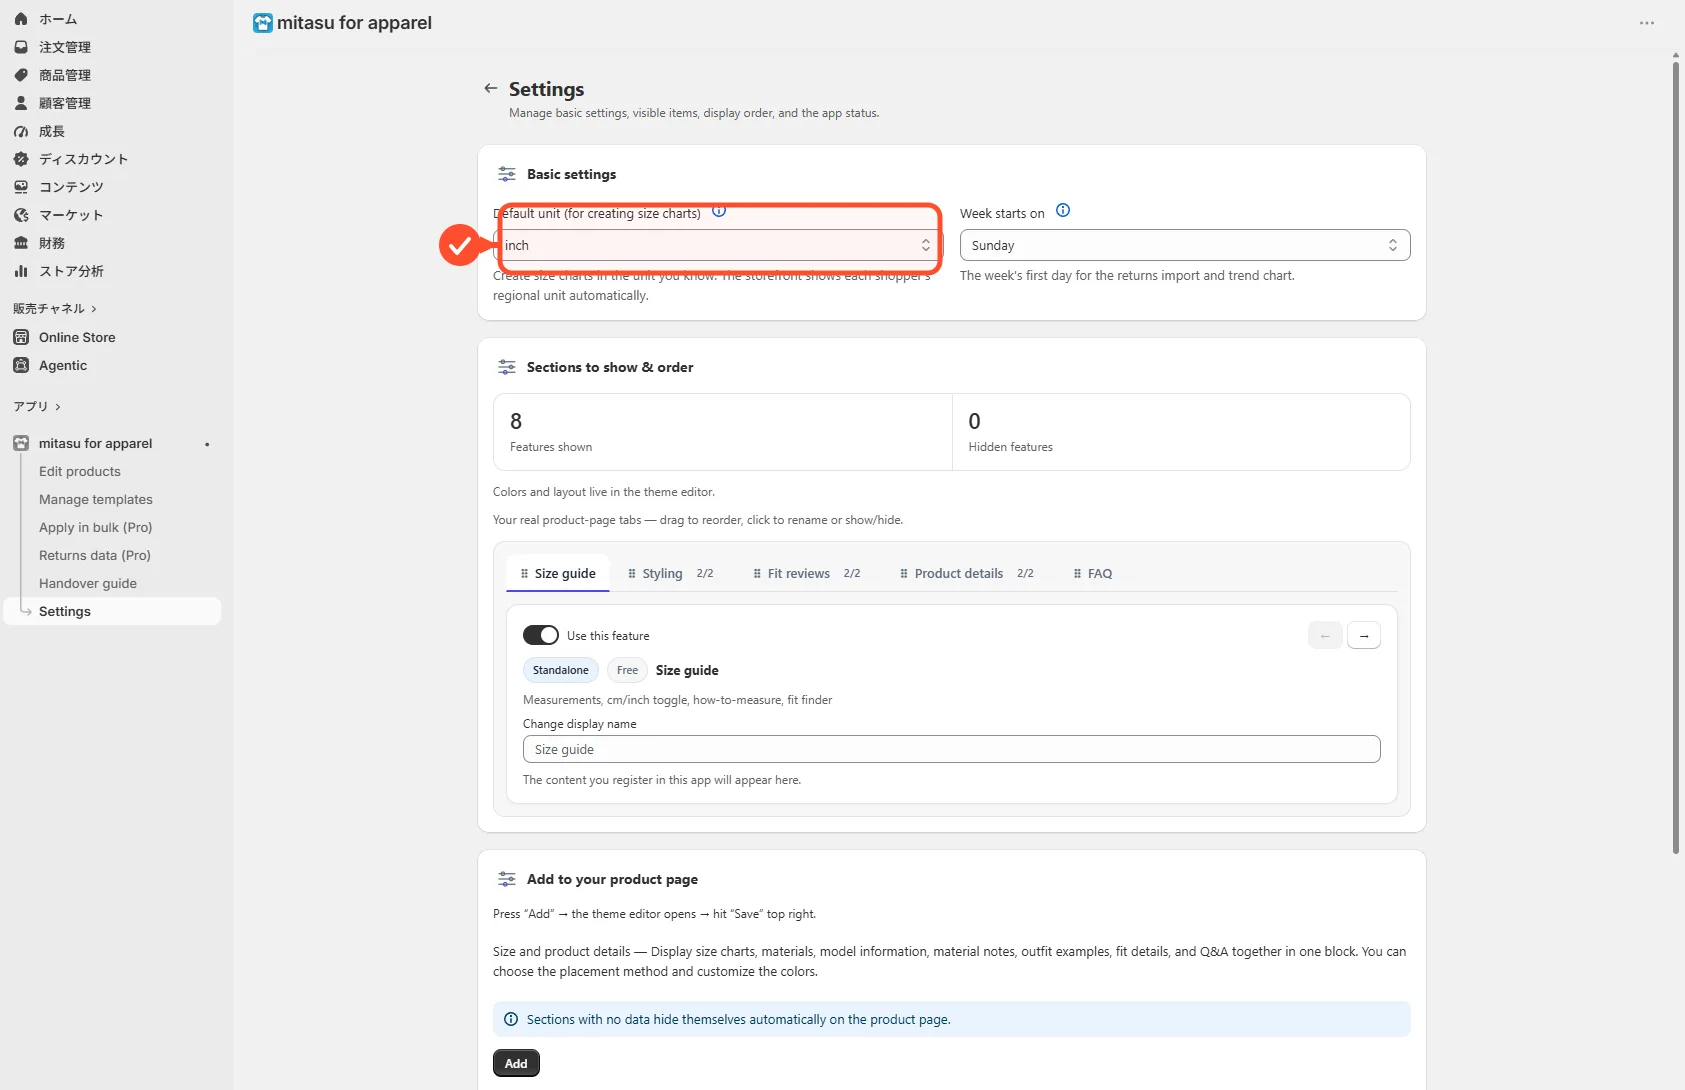
About units (entry unit from Settings, automatic on the storefront) Free
The unit you enter values in follows the store's Settings → Default unit. It's set automatically by country (inch for US stores, cm elsewhere by default) and you can change it anytime in Settings. Whichever you choose, the saved values are always stored internally in cm, so switching units later never corrupts your data.
On the storefront, the display automatically shows each shopper their own regional unit (inch for US/CA, cm elsewhere), and shoppers can toggle it themselves too.
The measurement figure is built in Free
Every template comes with a built-in measurement figure — real photos marking exactly where to measure. Shoppers can open it from the storefront size chart at any time, so you don't need to write your own measuring instructions.
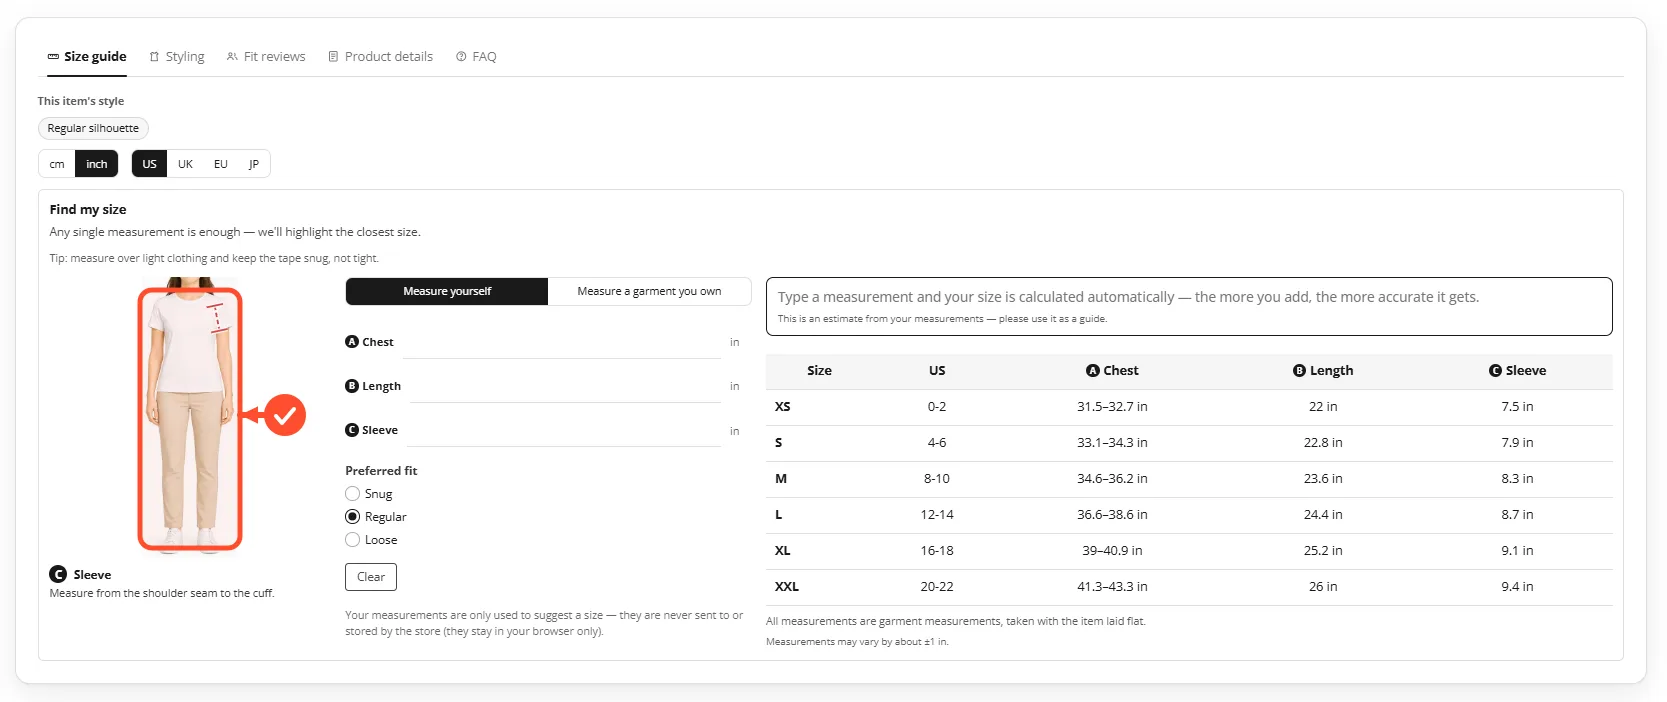
Fit finder (size suggestion) Free
The fit finder suggests a size from the measurements a shopper enters. It is not AI — it runs a standard apparel sizing method entirely inside the shopper's browser. Nothing is sent anywhere, so it's fast and gives the same, consistent result every time.
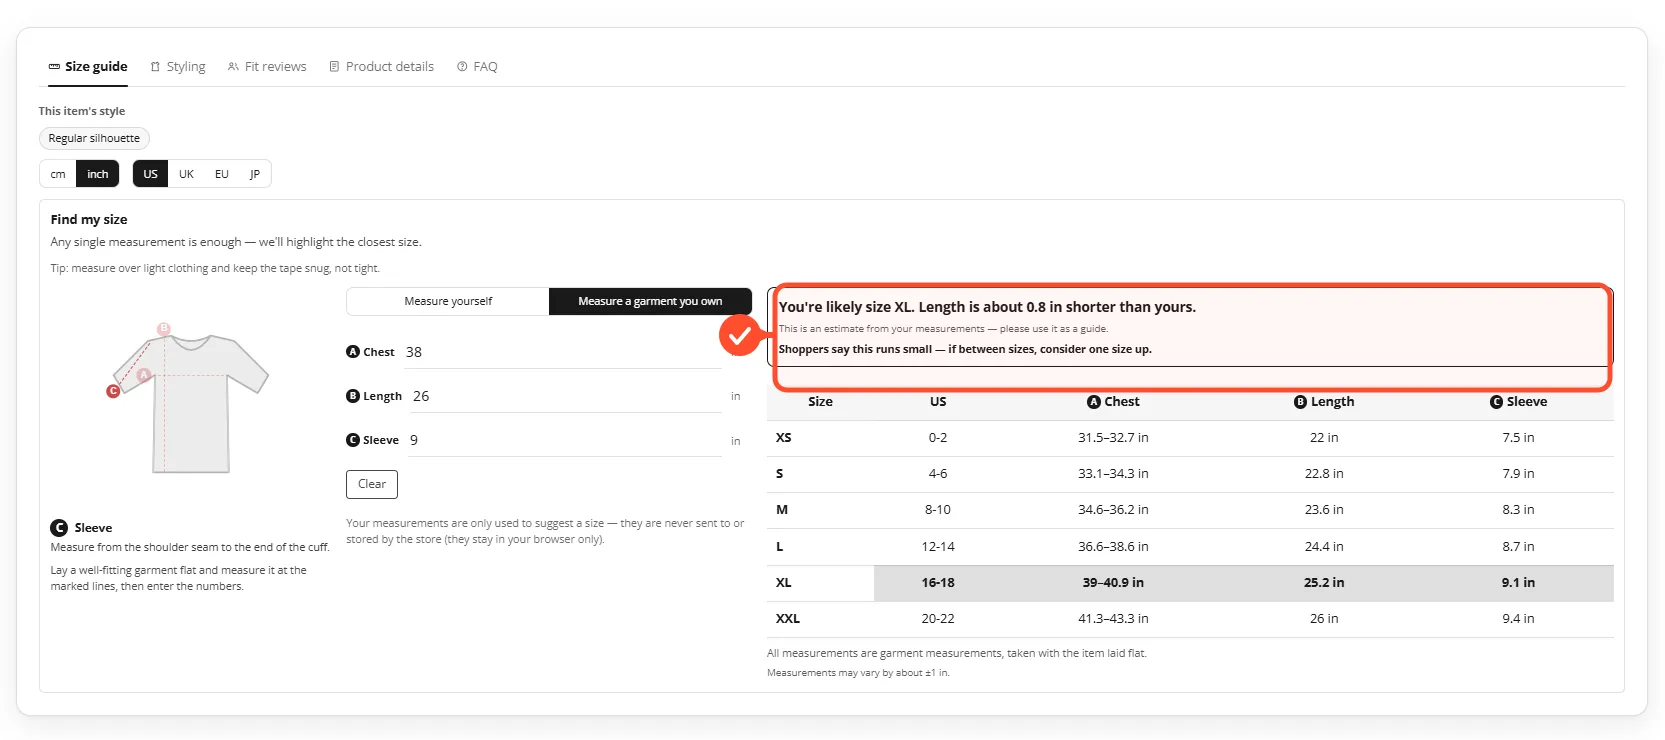
Replace the measurement figure with a custom template Free
Only the blank (custom) template unlocks the category and measurement-figure settings. Register two images — a body-shape figure and an actual-size figure — to replace the built-in measurement figure shown on the storefront.
Content templates
Models, material notes, Q&A, and outfits all work the same way: create a reusable template once, then assign it to products. Per-product overrides are covered in a later chapter.
Create a model profile Pro
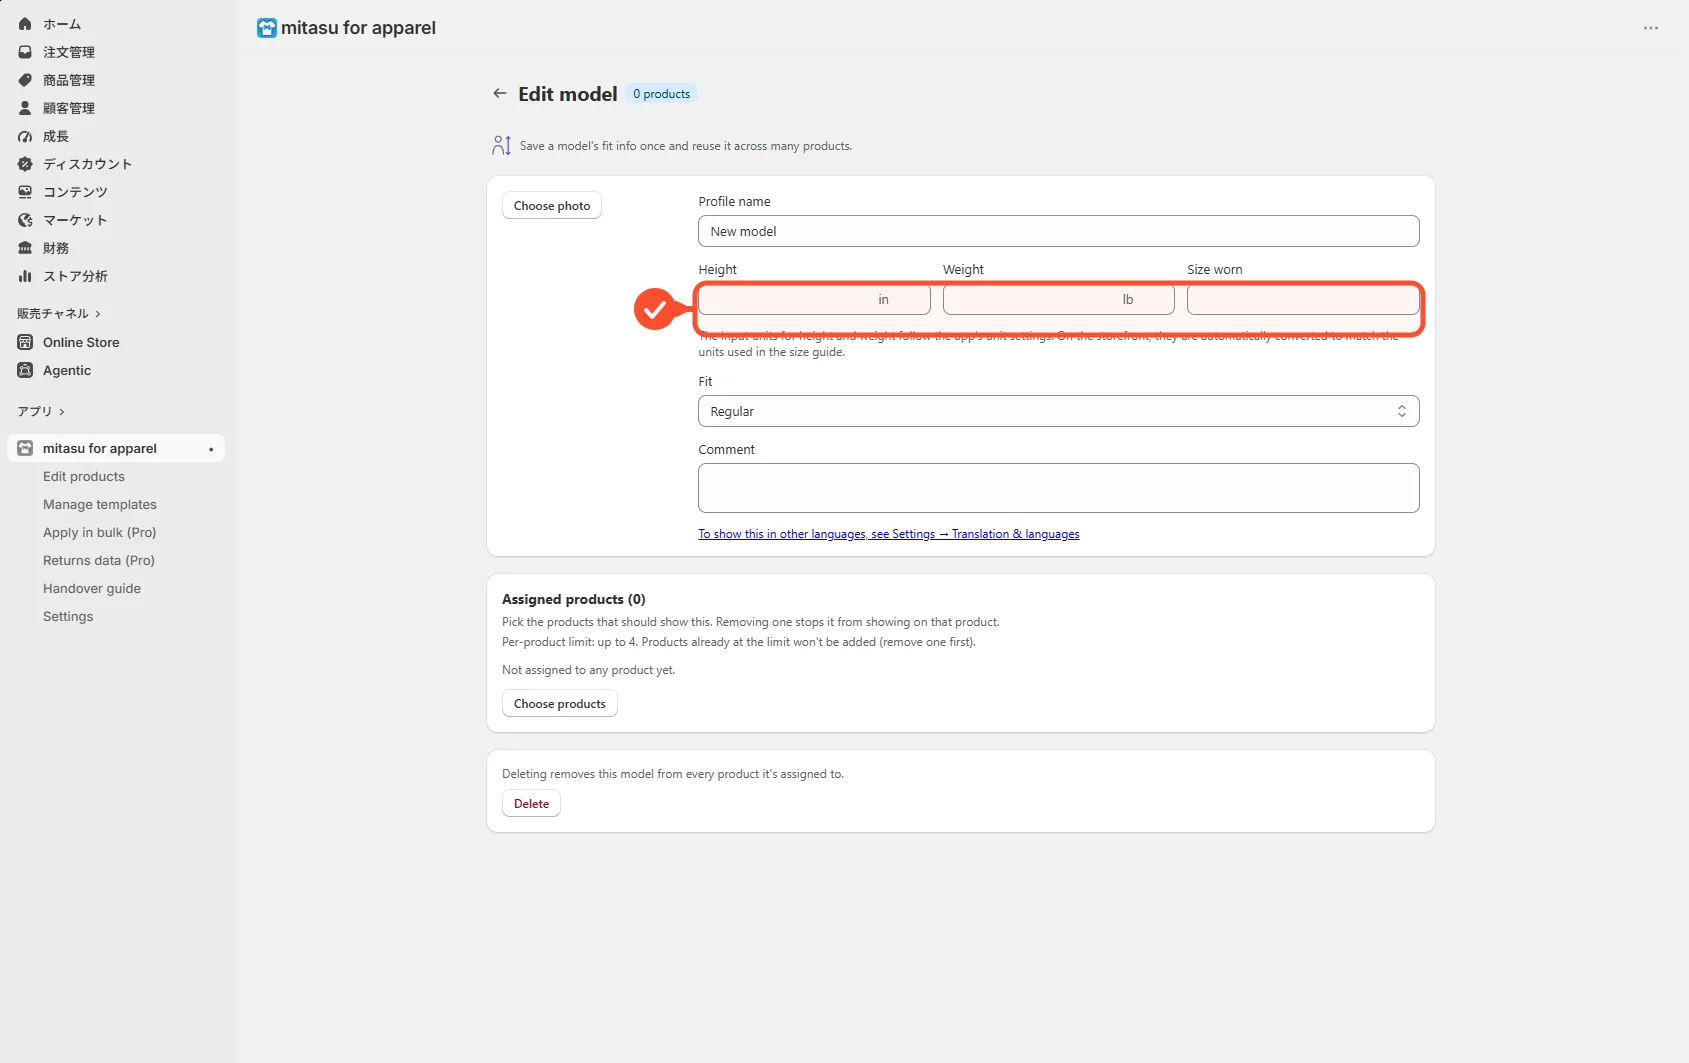
A model profile bundles a model's height, the size they're wearing, a fit comment, and a photo into a reusable template. Save it once and assign it to as many products as you like. Seeing a real person wearing the item helps shoppers judge fit against their own body.
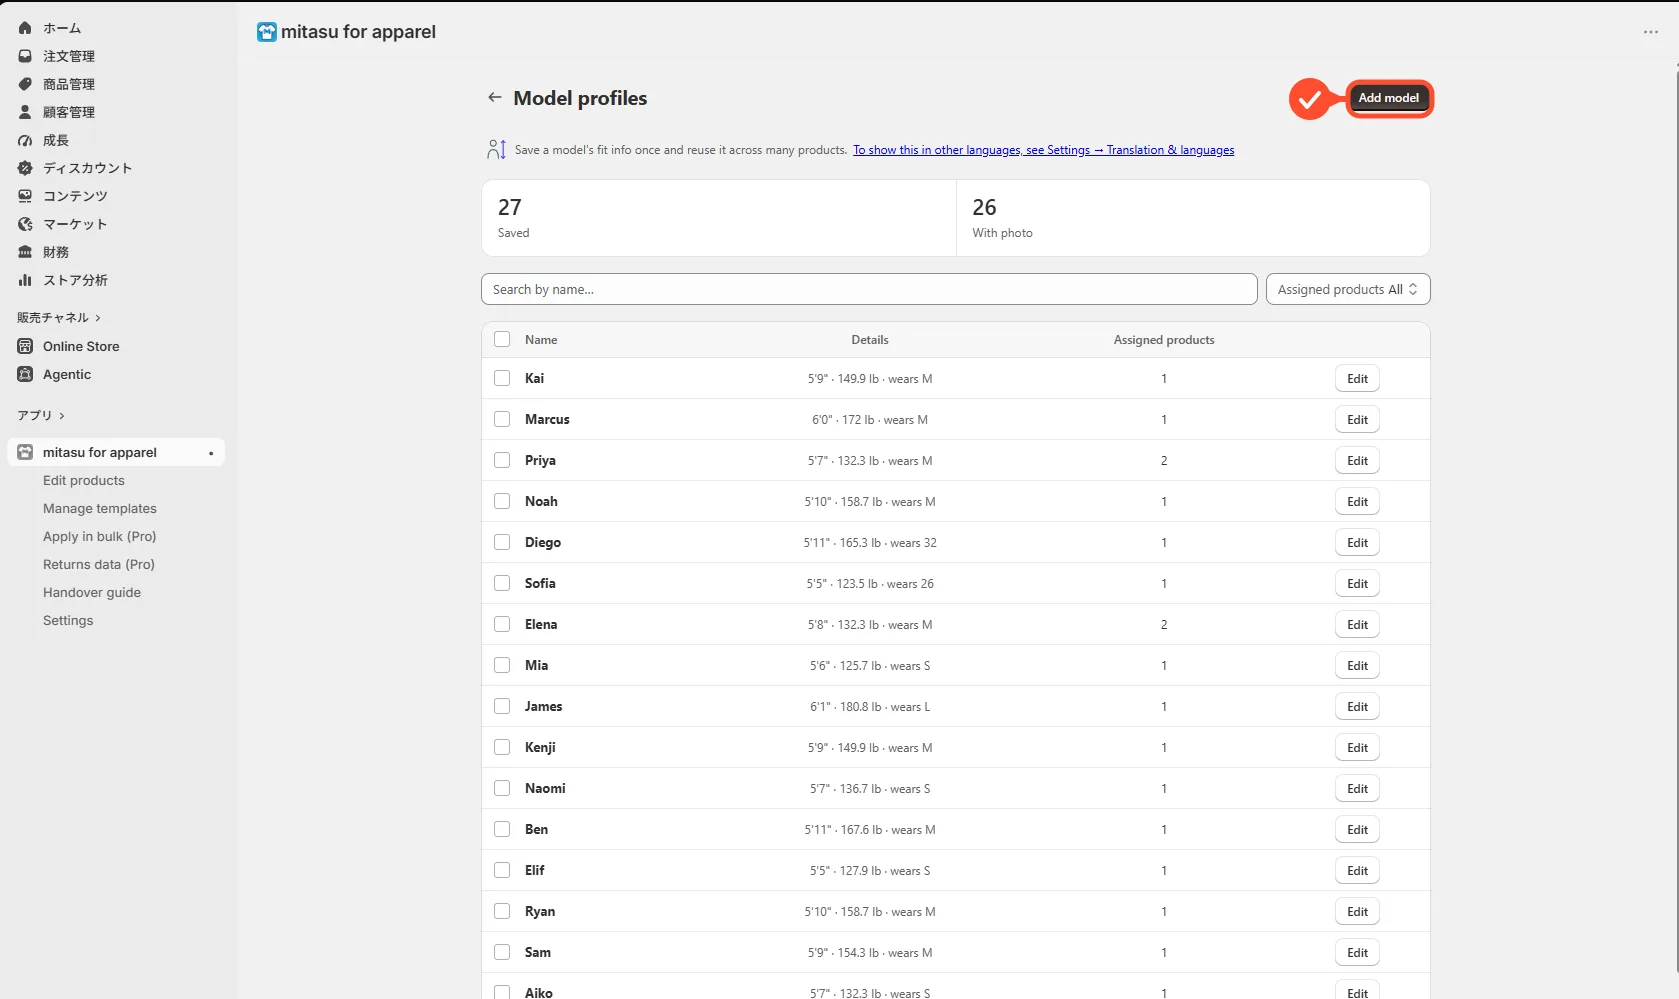
- Open Model profiles and check the list.
- Click "Add model" to register height, size worn, a fit comment, and a photo.
- Save, then assign it to products from the product edit page.
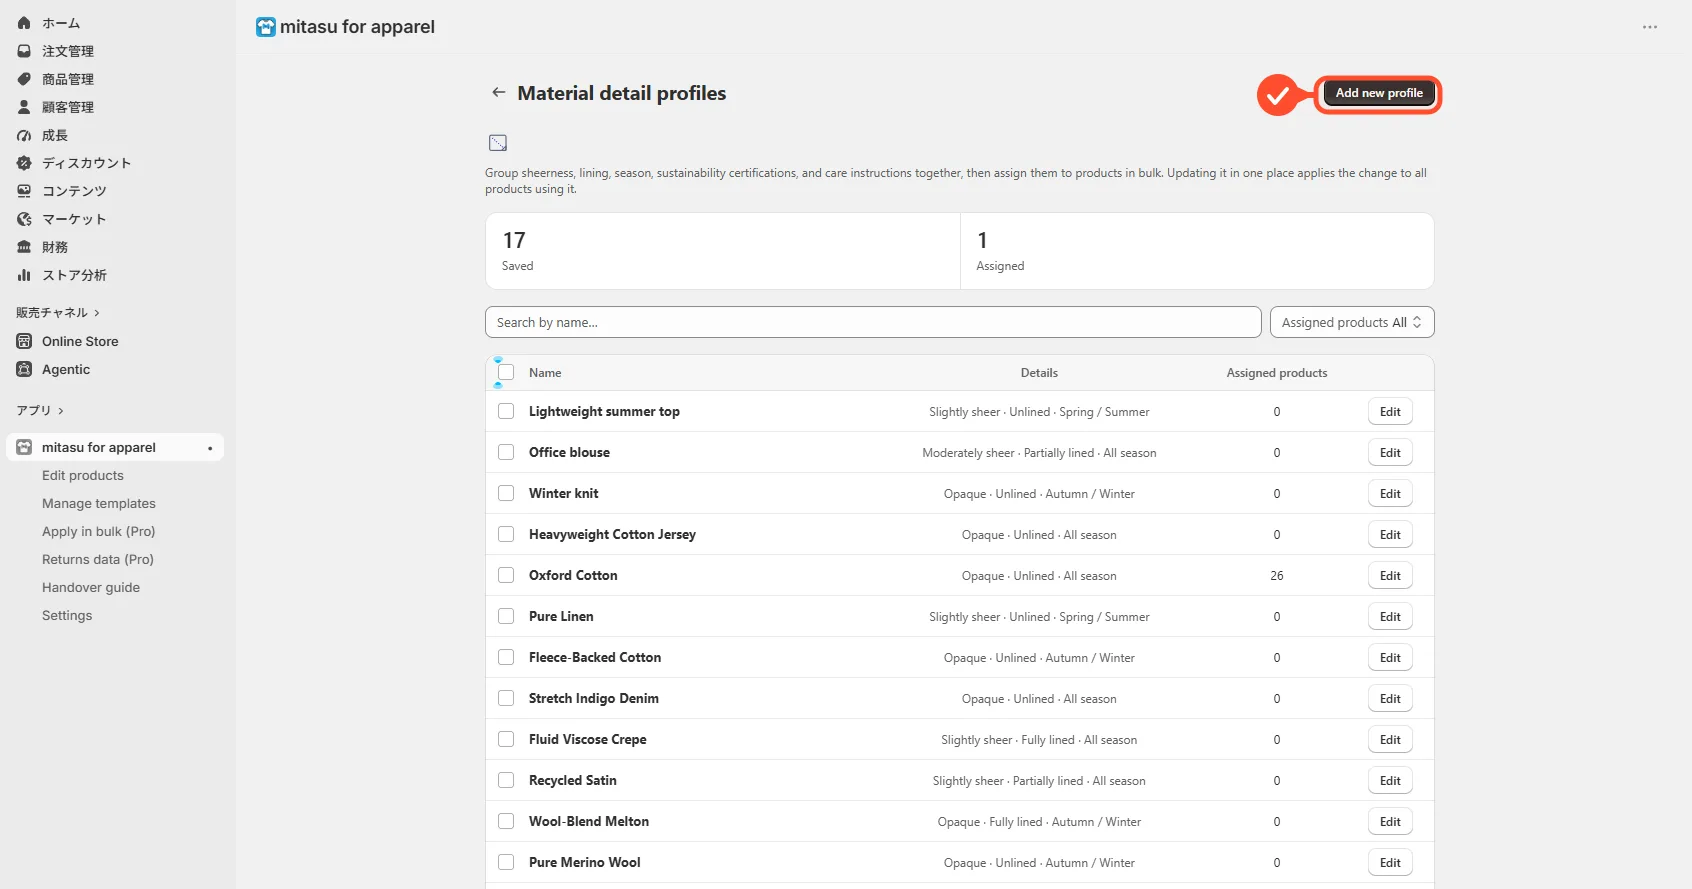
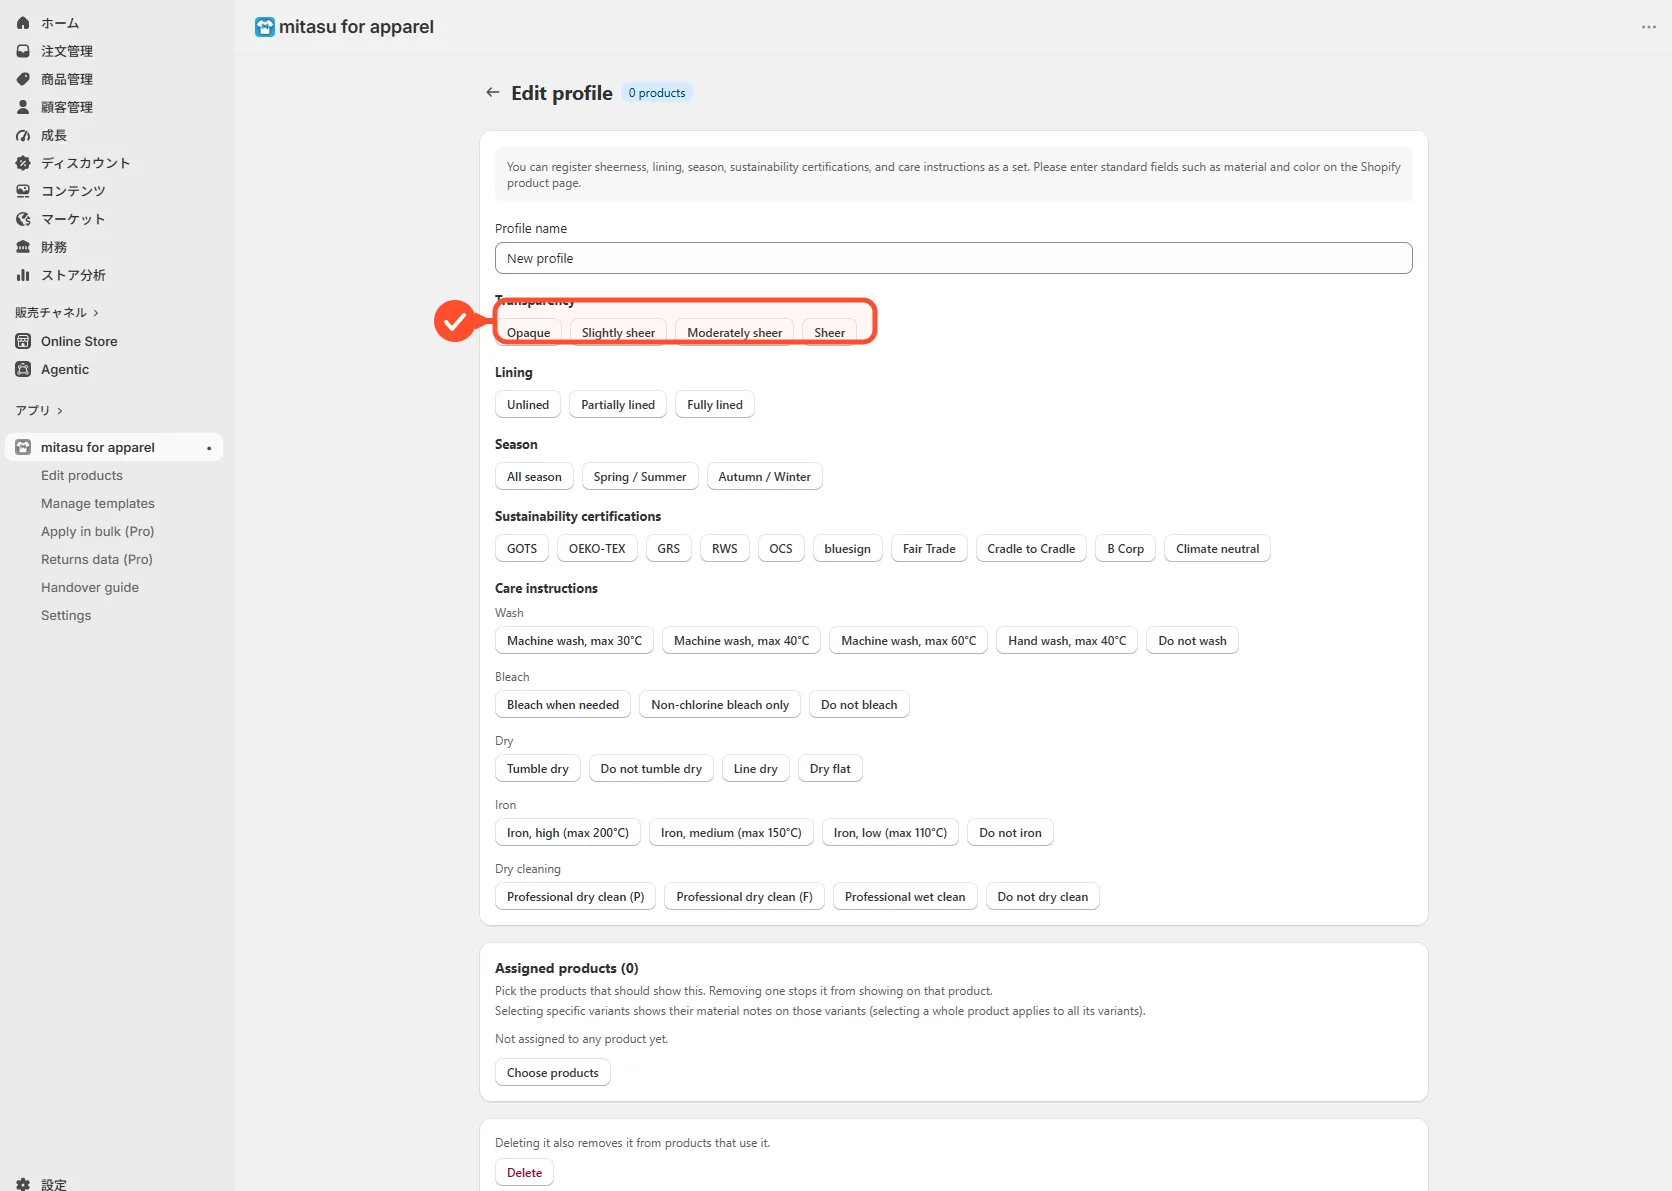
Create material notes Pro
Material notes group sheerness (transparency), lining, season, stretch, sustainability certifications, and care instructions into a reusable template — created once and assigned to products, the same way as model profiles. Update it in one place and the change applies to every product using it. Care instructions appear on the storefront as plain-text pill labels (wash, bleach, dry, iron, dry cleaning) — never as care-symbol icons.
- Open Material detail profiles and check the list.
- Click "Add new profile" to enter sheerness, lining, season, stretch, certifications, and care instructions.
- Save, then assign it to products from the product edit page.
Build a Q&A library Free
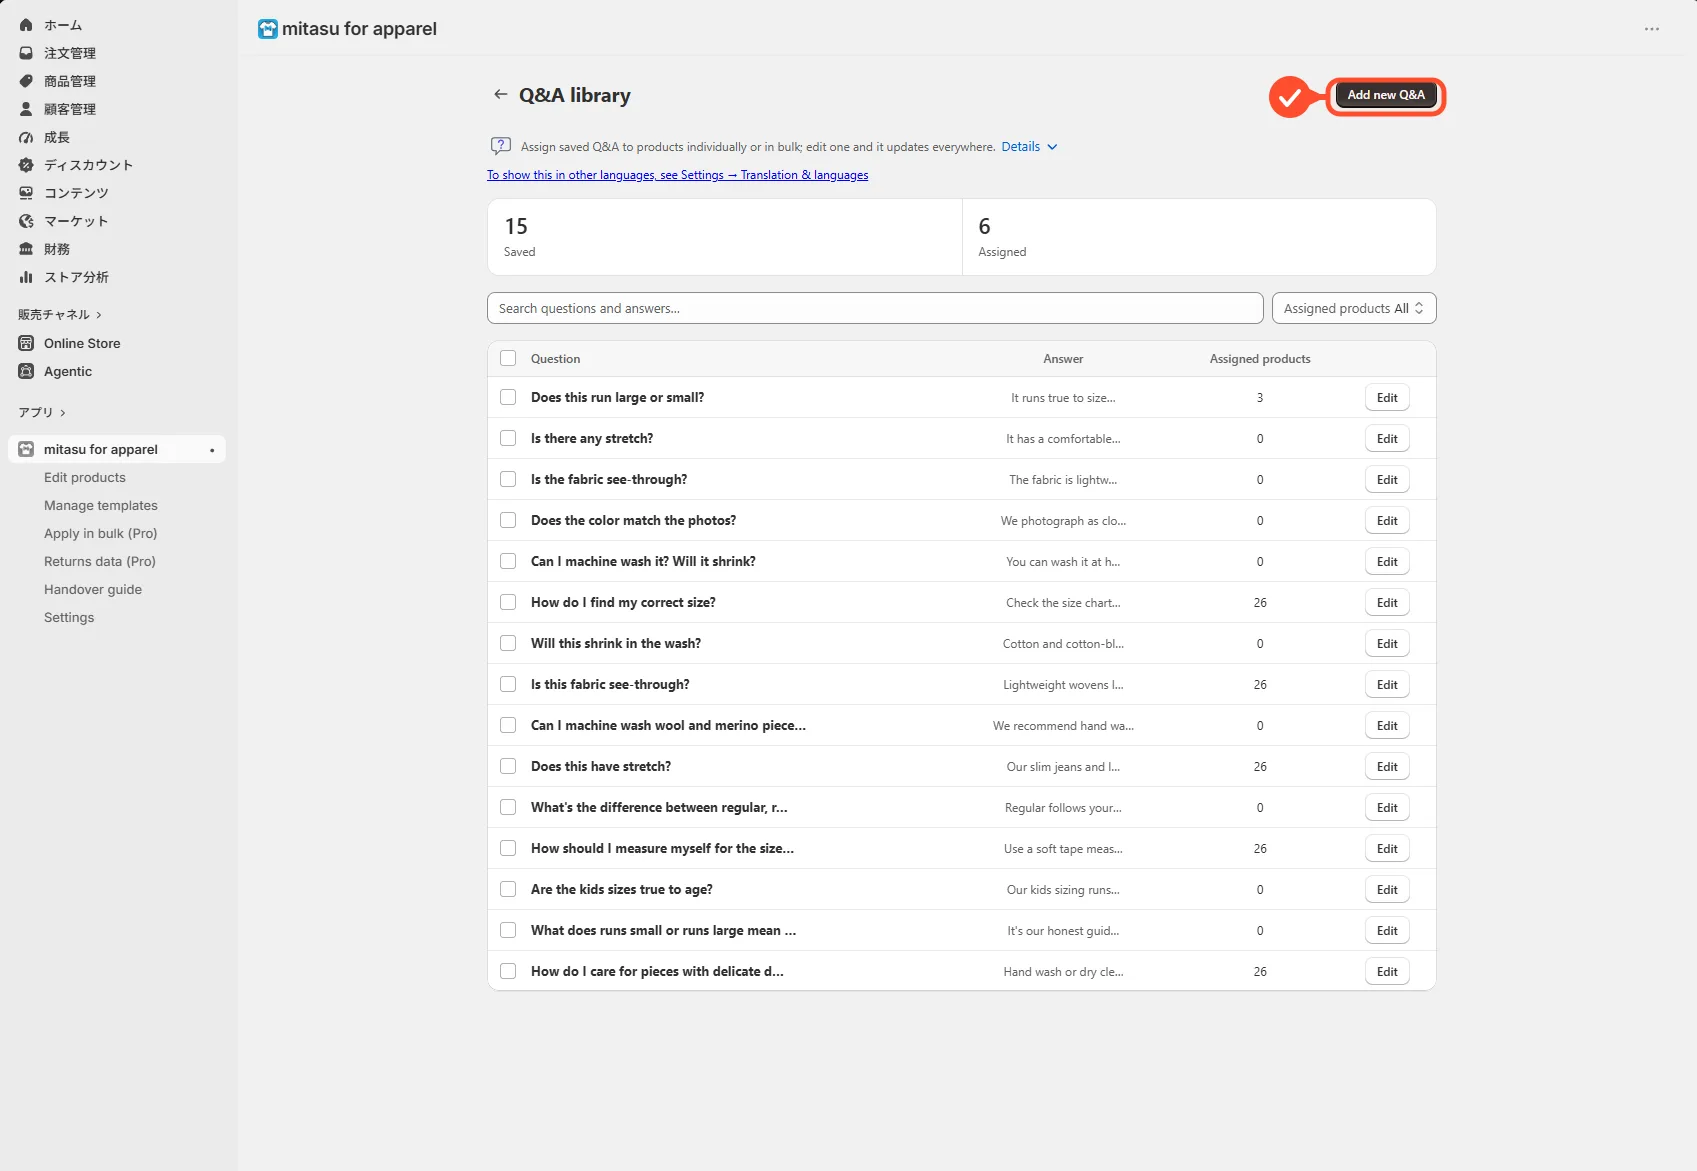
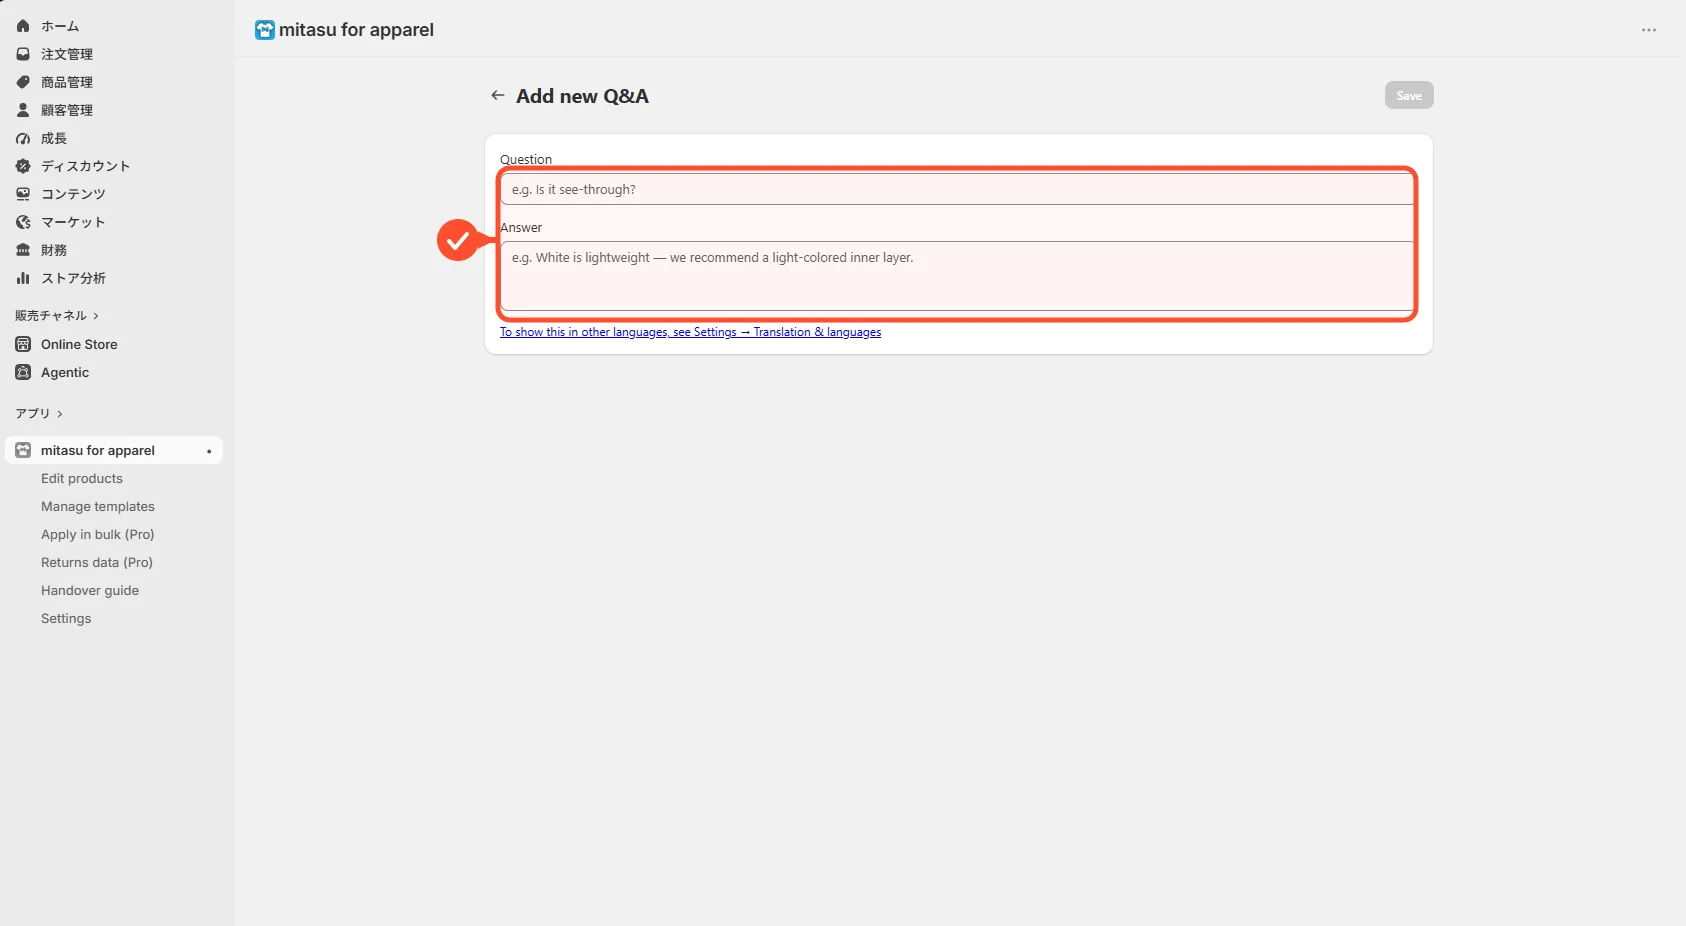
The Q&A library lets you save common questions and answers once, then assign them to as many products as you like — up to 10 per product.
- Open Q&A library and check the list.
- Click "Add new Q&A" to enter a question and its answer.
- Save, then assign it to products from the product edit page (up to 10 per product).
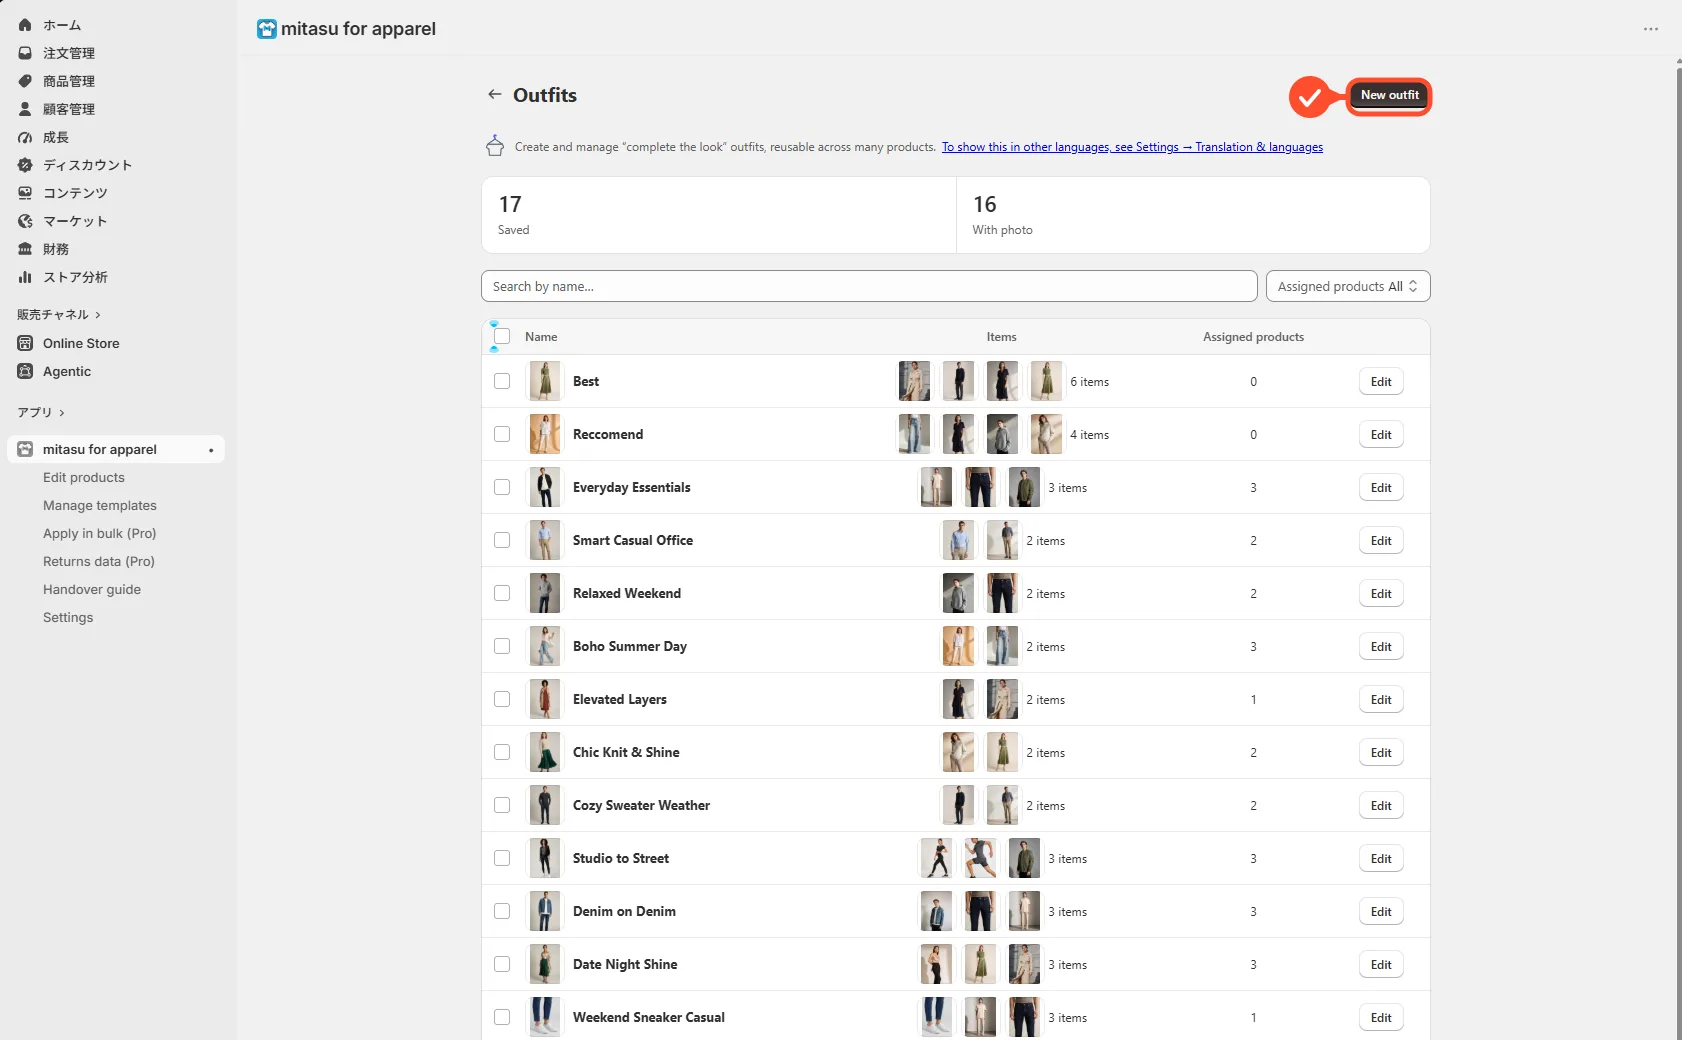
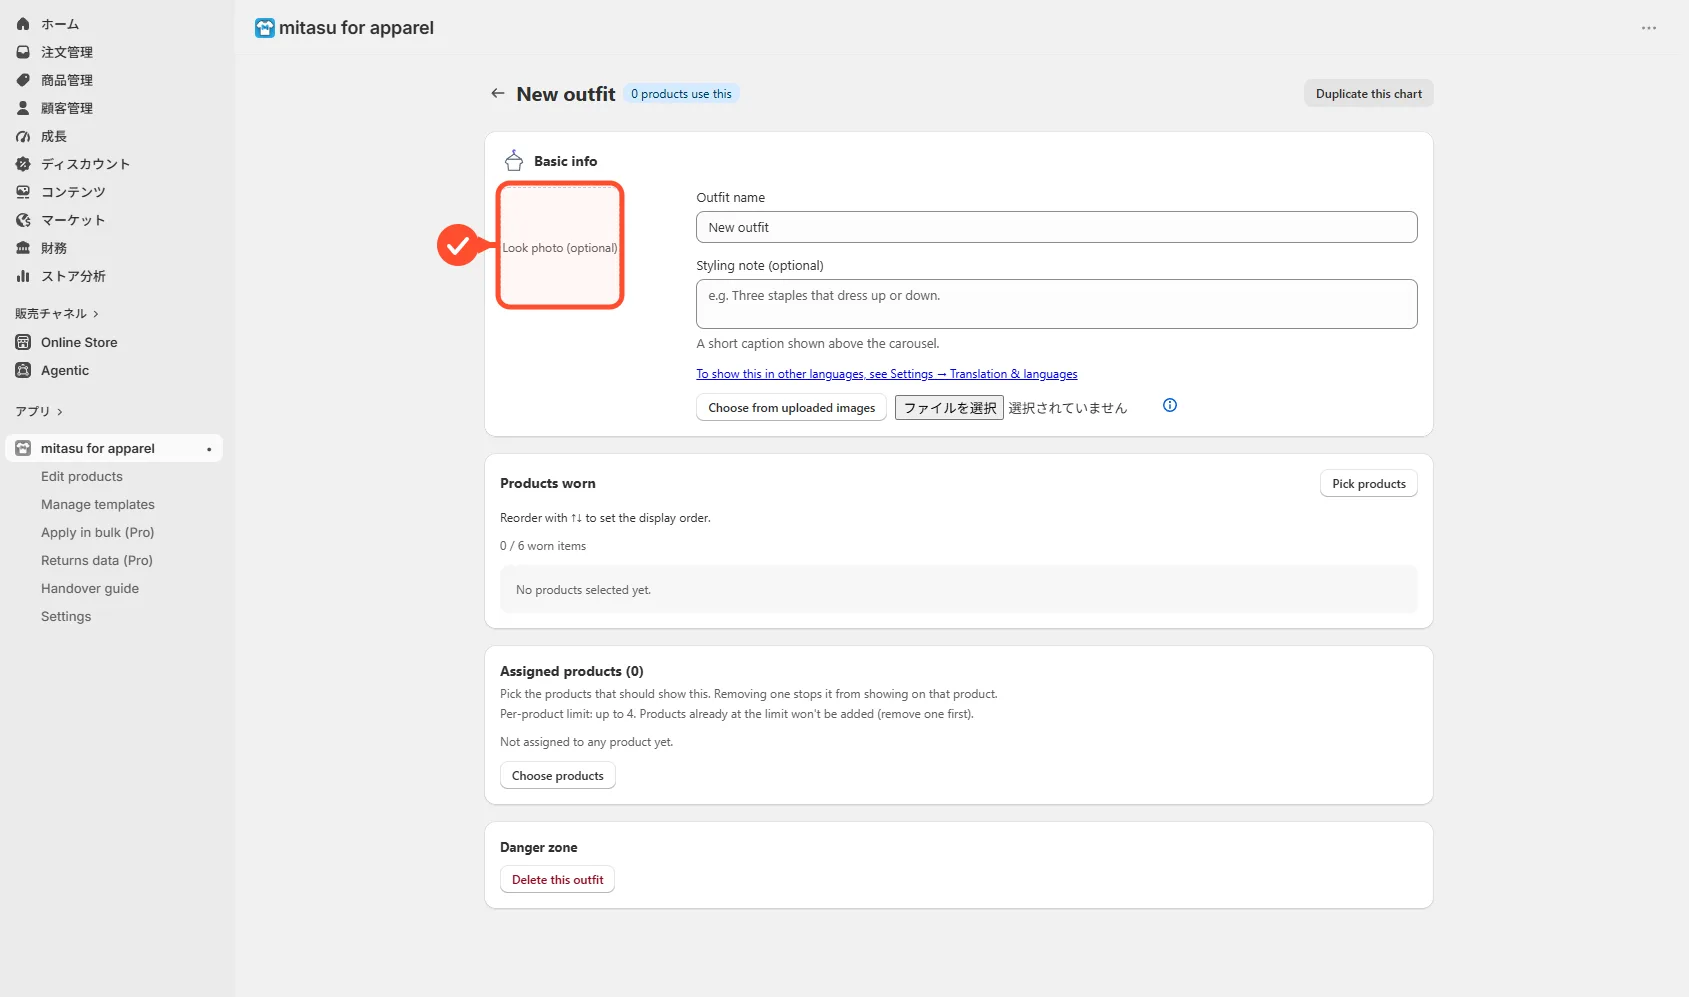
Create an outfit Pro
An outfit is a "complete the look" template that pairs a photo with the items worn in it. Each outfit can list up to 6 worn items, and each product can have up to 4 outfits assigned to it.
- Open Outfits and check the list.
- Click "New outfit" to register a photo and its worn items (up to 6).
- Save, then assign it to products from the product edit page (up to 4 per product).
Assigning & overriding
Templates you create are put to use by assigning them to products from the product edit page. This chapter covers assigning to one product at a time, bulk-assigning to many products, and overriding a single product.
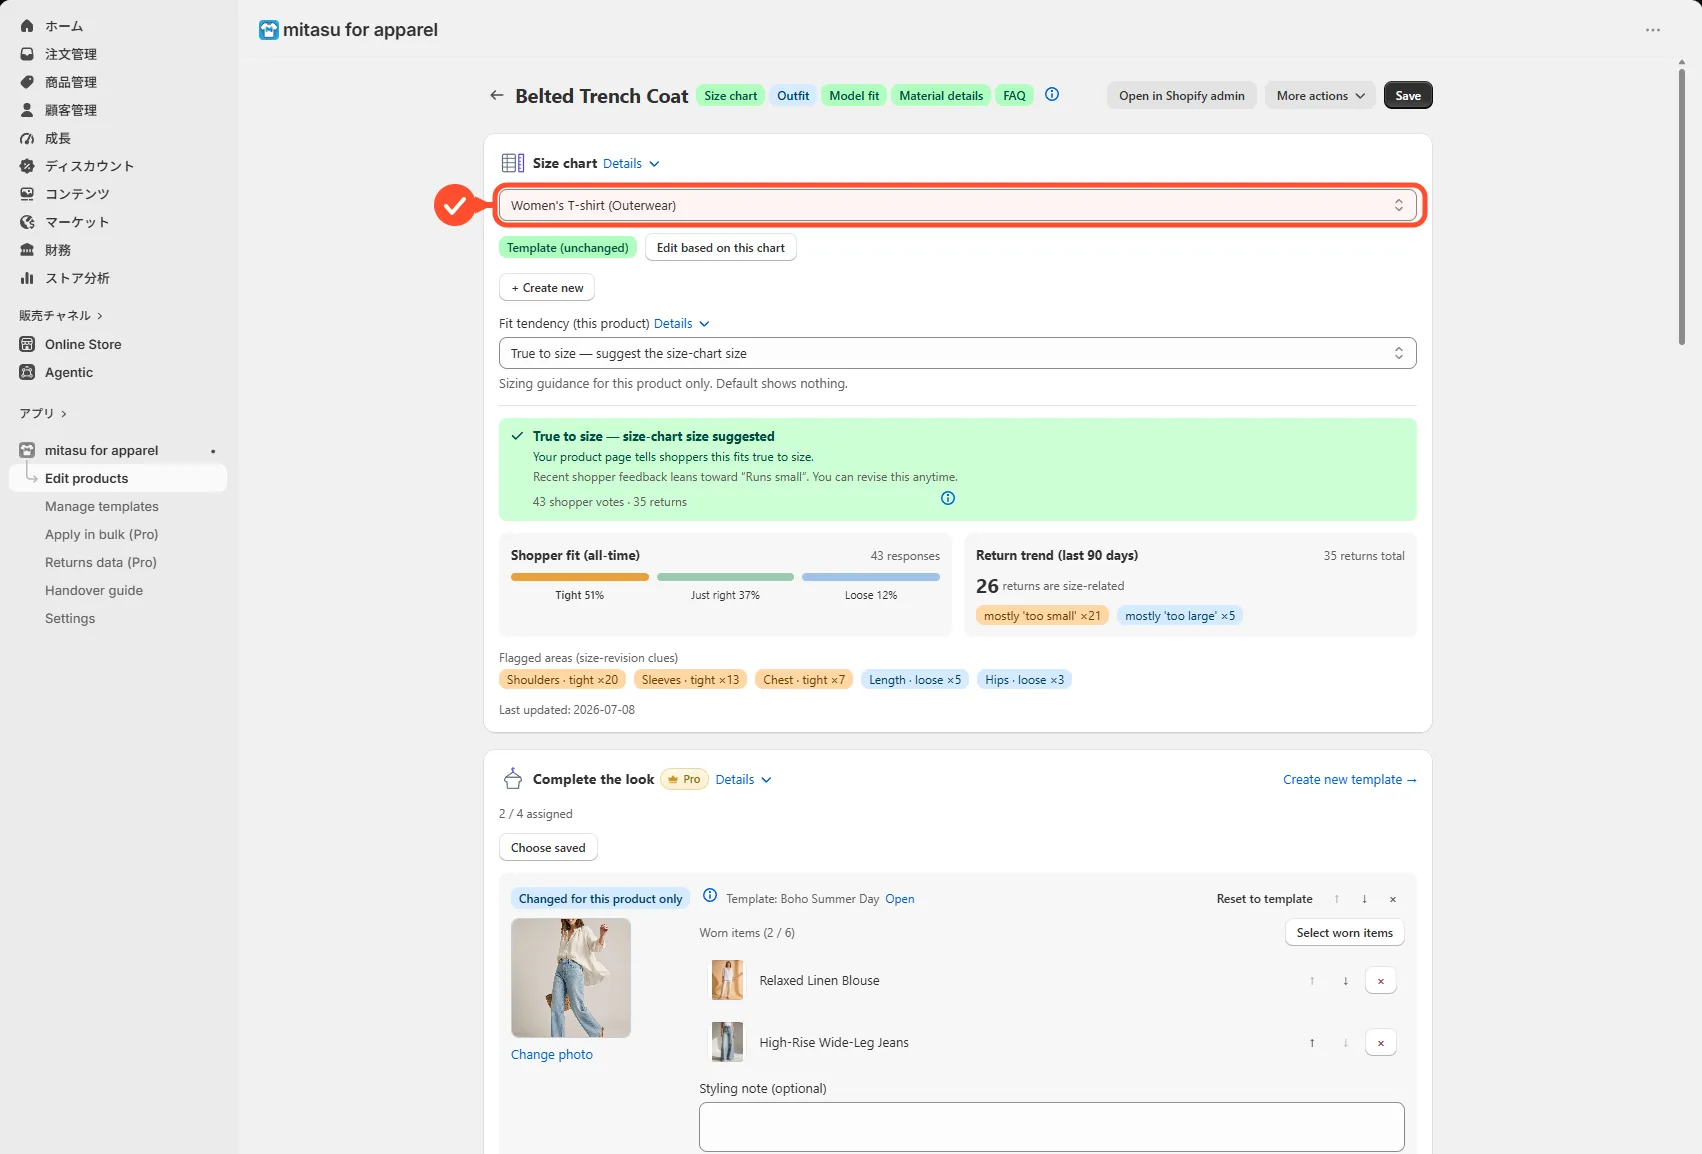
Assign templates to a product
On the product's edit page, choose which size chart, model, material notes, Q&A, and outfits this product uses. Size charts and Q&A are free; models, material notes, and outfits are Pro.
- Open the product's edit page.
- In the app's section, pick each template you want to assign.
- Save, and it appears on the storefront right away.
Bulk-assign to many products Pro
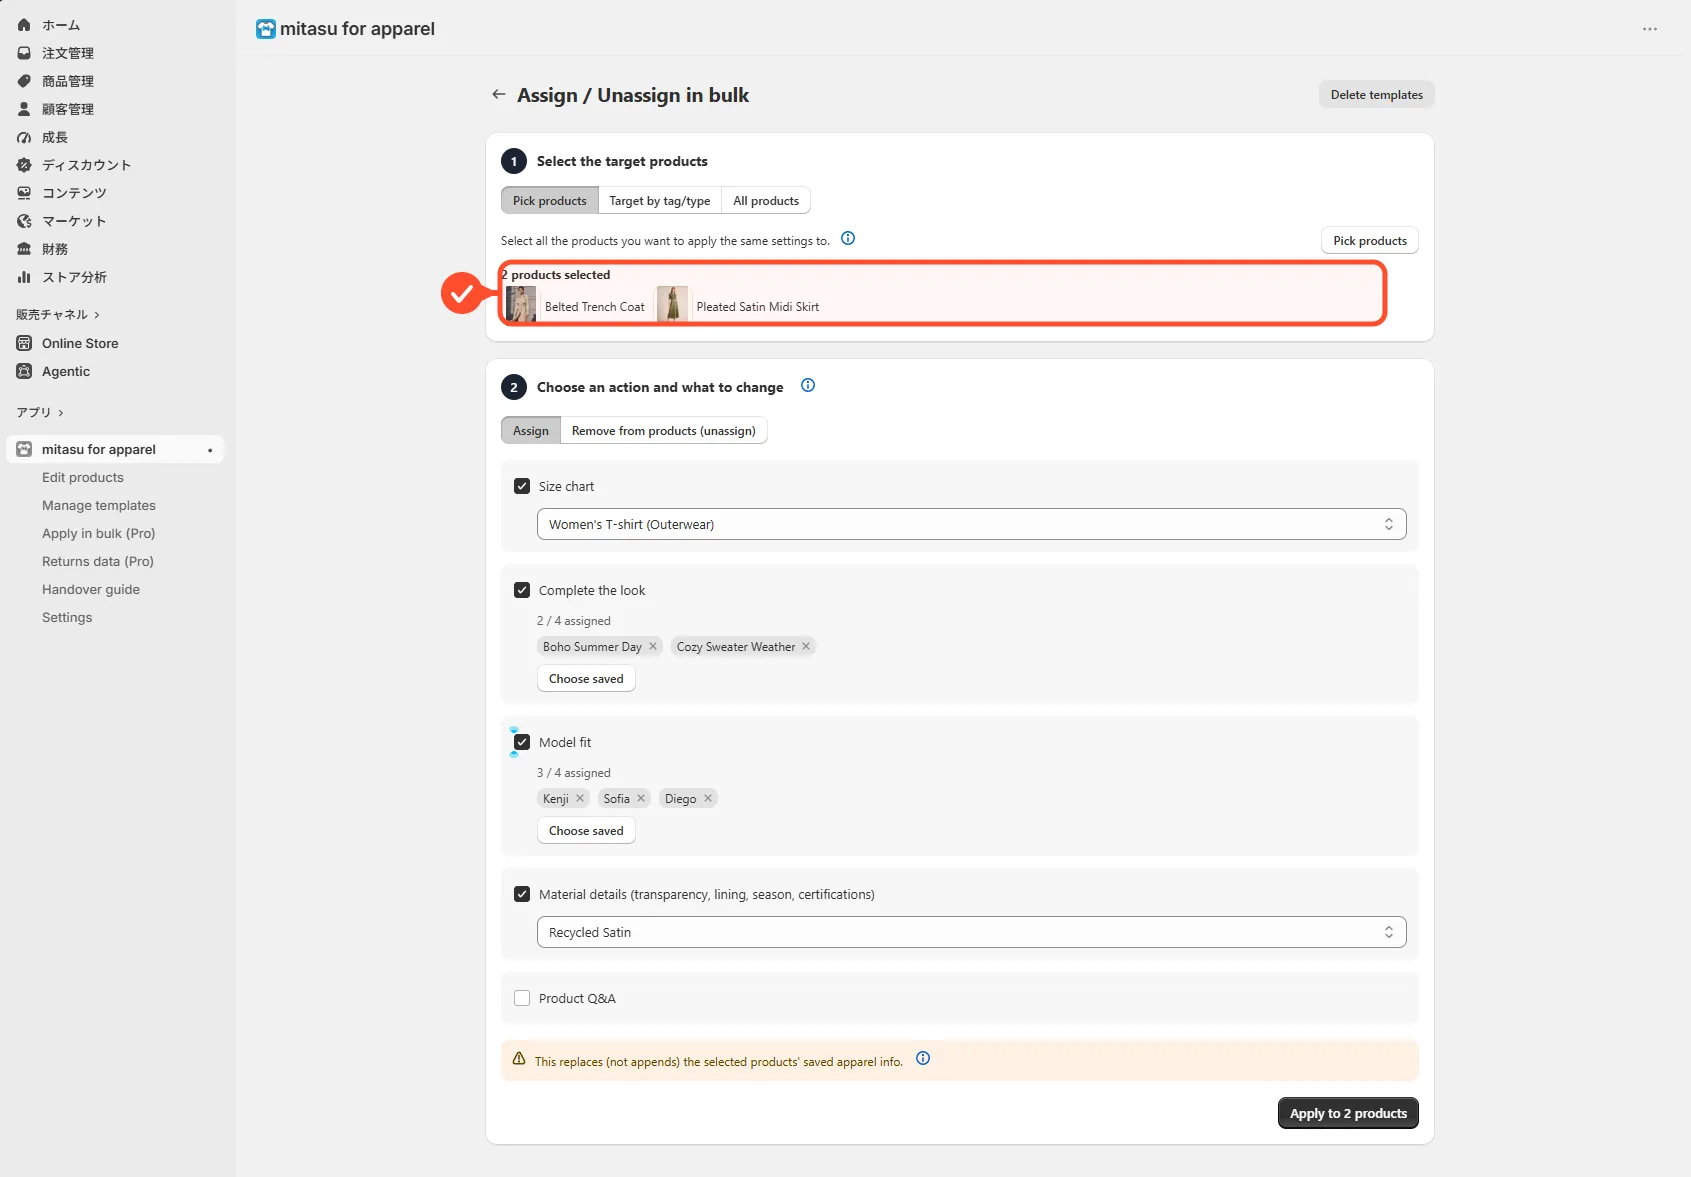
Bulk assign applies the same templates to many products at once. Select the products, then choose the saved templates you want to apply — the app replaces whatever those products had. Any field you leave unselected is skipped, so existing assignments for that field are left alone.
To remove an assignment, do that from the individual product's edit page — bulk assign isn't the tool for unassigning.
- Open Bulk assign and select the products.
- Choose the size chart, model, material notes, Q&A, and outfits to apply.
- Run it, and every selected product is updated.
Override just this product
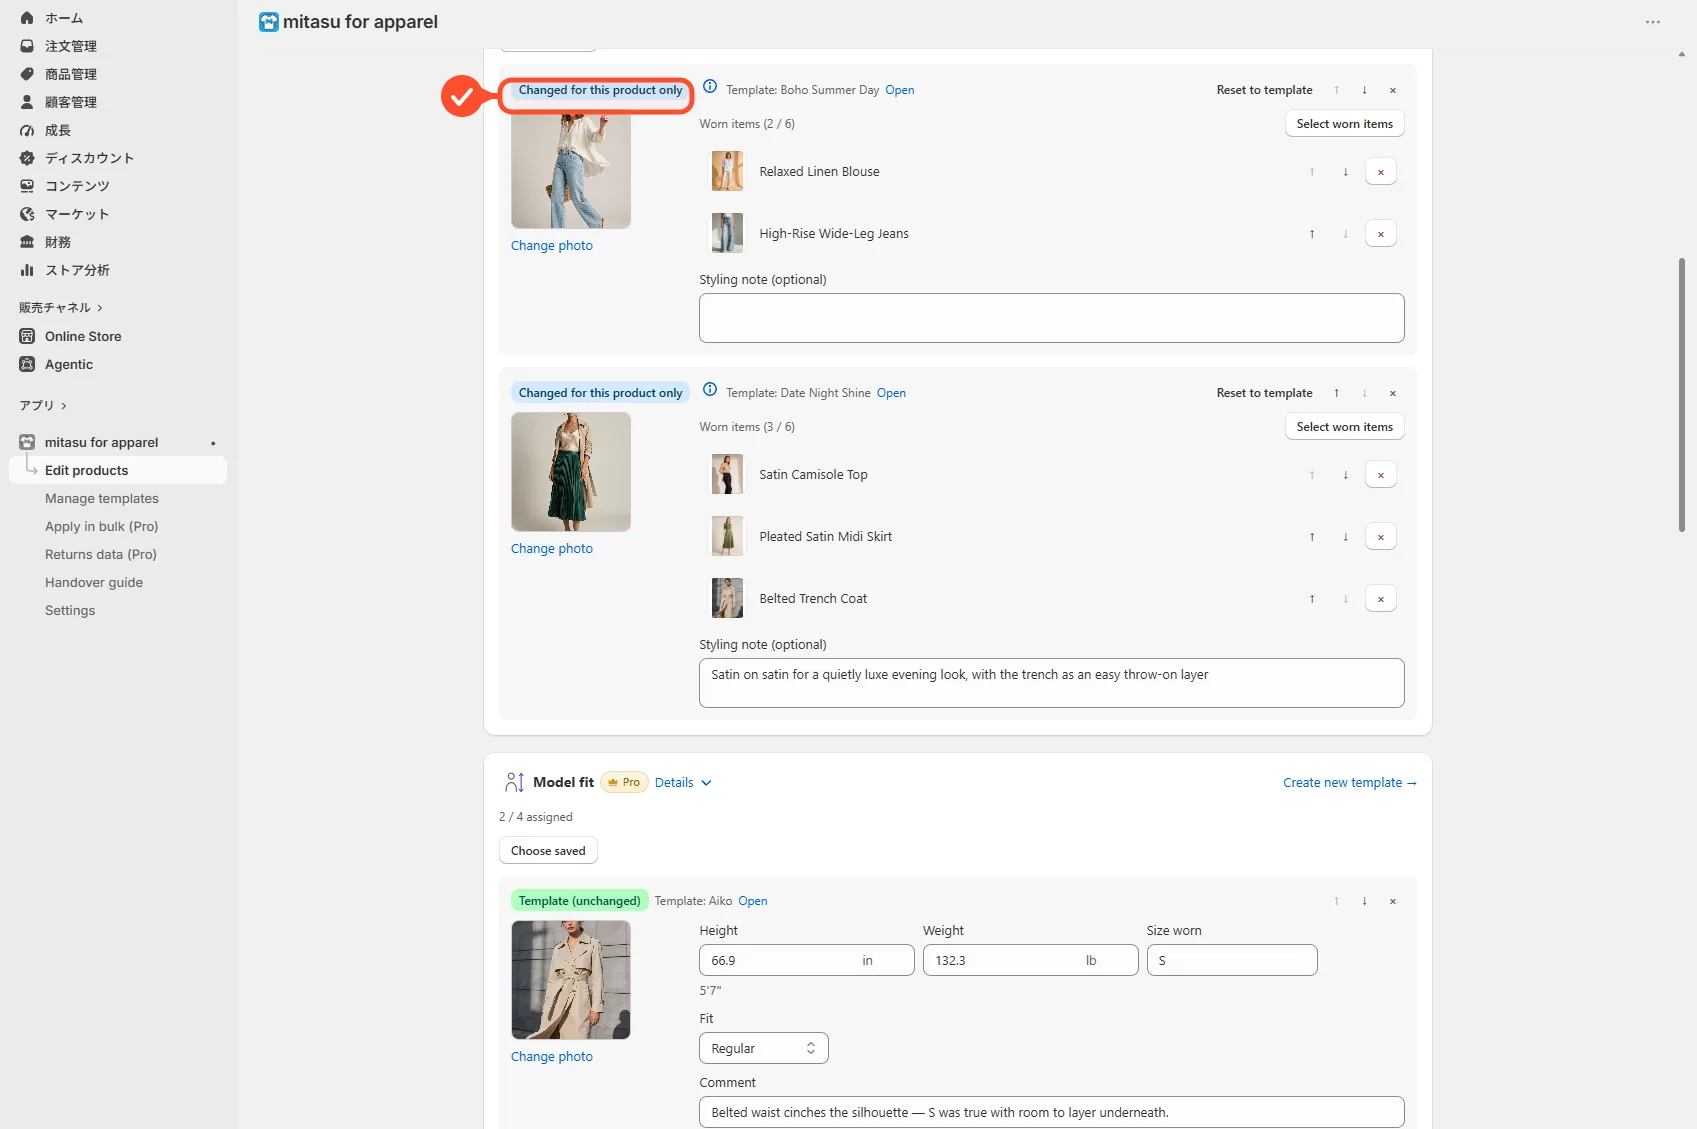
When you want to change the content for just one product while everything else keeps using the shared template, use an override. Choose "Changed for this product only," edit the content, and only that product gets the custom content — the template itself and every other product using it are unaffected. Later updates to the template won't touch the overridden product.
Fit feedback & size confidence
A Pro feature that collects shopper fit votes — runs small, true to size, runs large — and shows the trend on the storefront as a size-confidence signal. You can also import past returns data to help inform your fit-tendency decisions and the returns analysis, but it's never added to the vote count and has no effect on the confidence badge.
Shopper fit voting Pro
On the storefront, shoppers can vote that an item runs small, is true to size, or runs large. Voting is anonymous — only an aggregate count is stored. No personal information, such as names or order details, is ever saved.
Set a product's fit tendency Pro
Even before many votes come in, you can set a fit tendency from your own experience — true to size, runs small, or runs large. It shows on the storefront as guidance right away, and once enough shopper votes accumulate, the real vote data automatically takes over the display.
When the size-confidence badge appears Pro
The storefront size-confidence badge appears once a product has 5 or more votes with a clear trend. If there's neither a fit tendency set nor enough votes yet, the badge simply stays hidden — it never shows uncertain guidance.
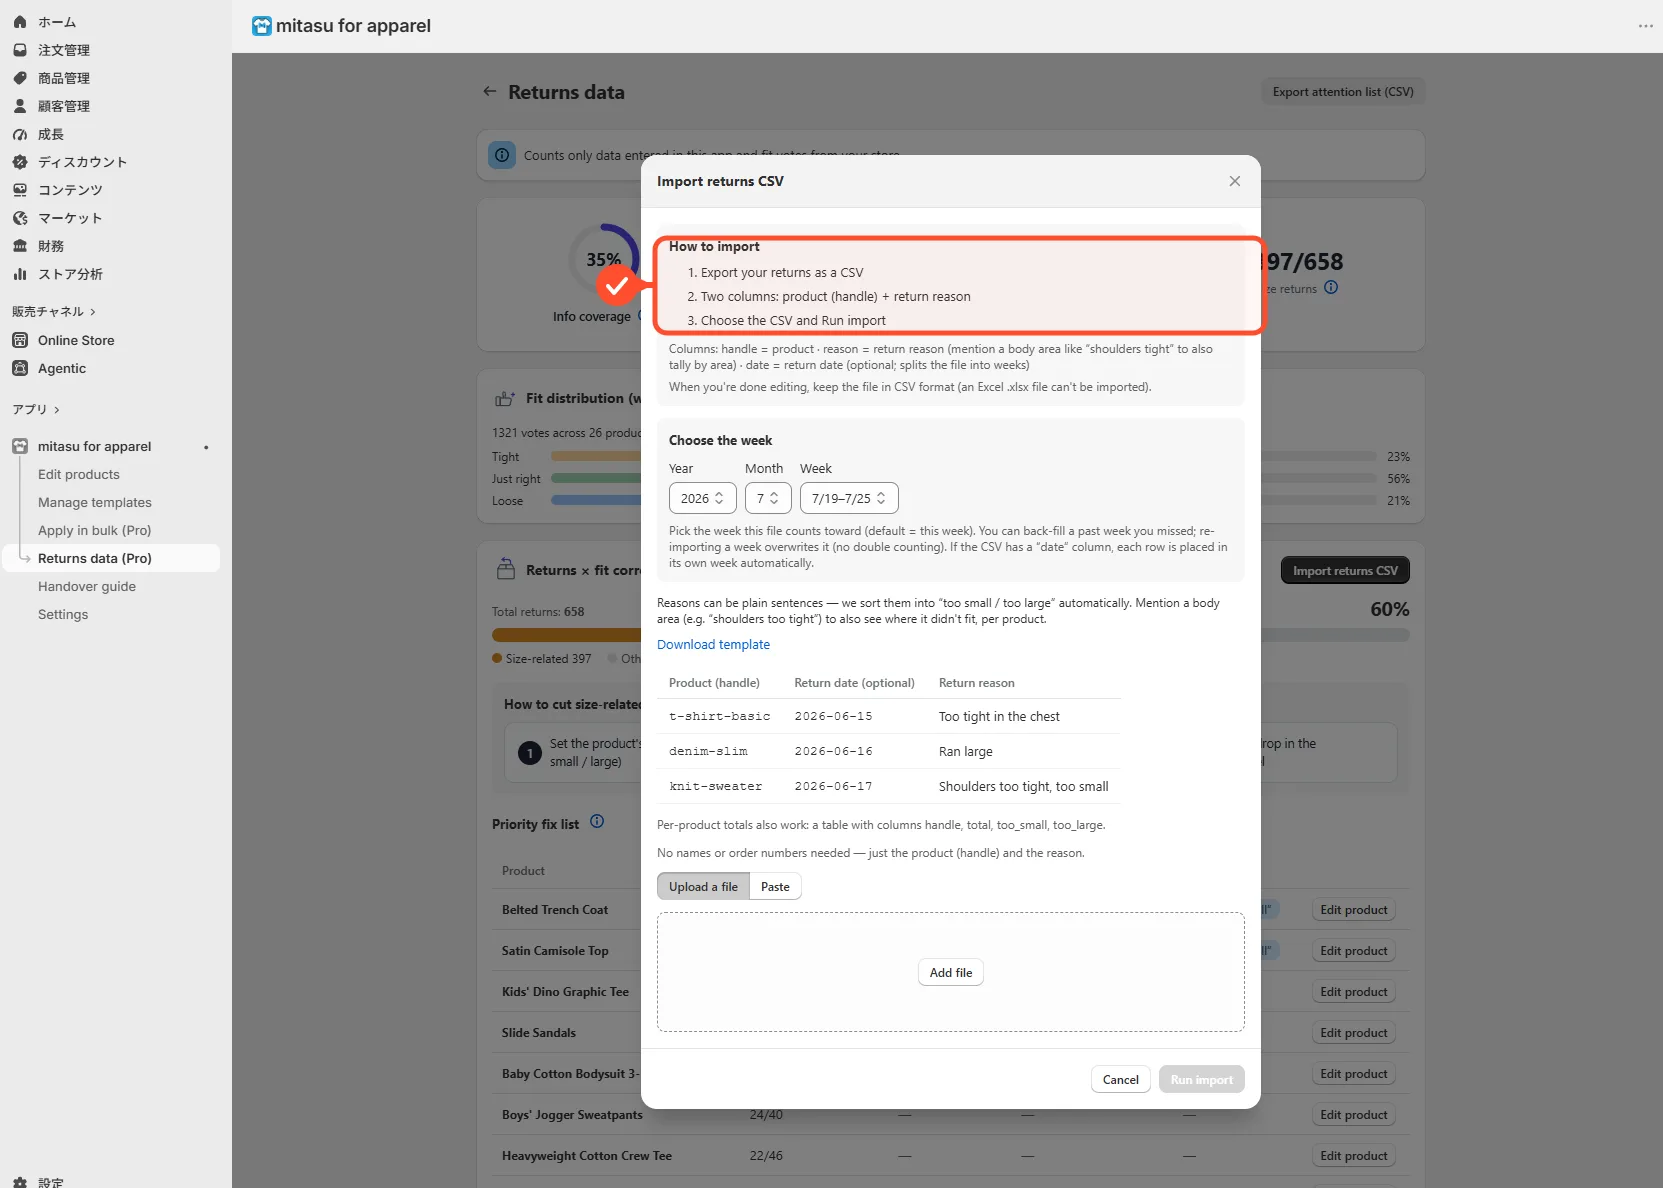
Import returns data by CSV Pro
Import your past returns data by CSV to help build fit-tendency insight. The import only uses the product handle and the return reason (or size-level counts) — it contains no shopper personal information at all, such as names, addresses, or order numbers. Any other columns in the file are simply ignored on import.
Insights
A Pro feature that turns the link between returns and fit into numbers, so you can see which products to fix first.
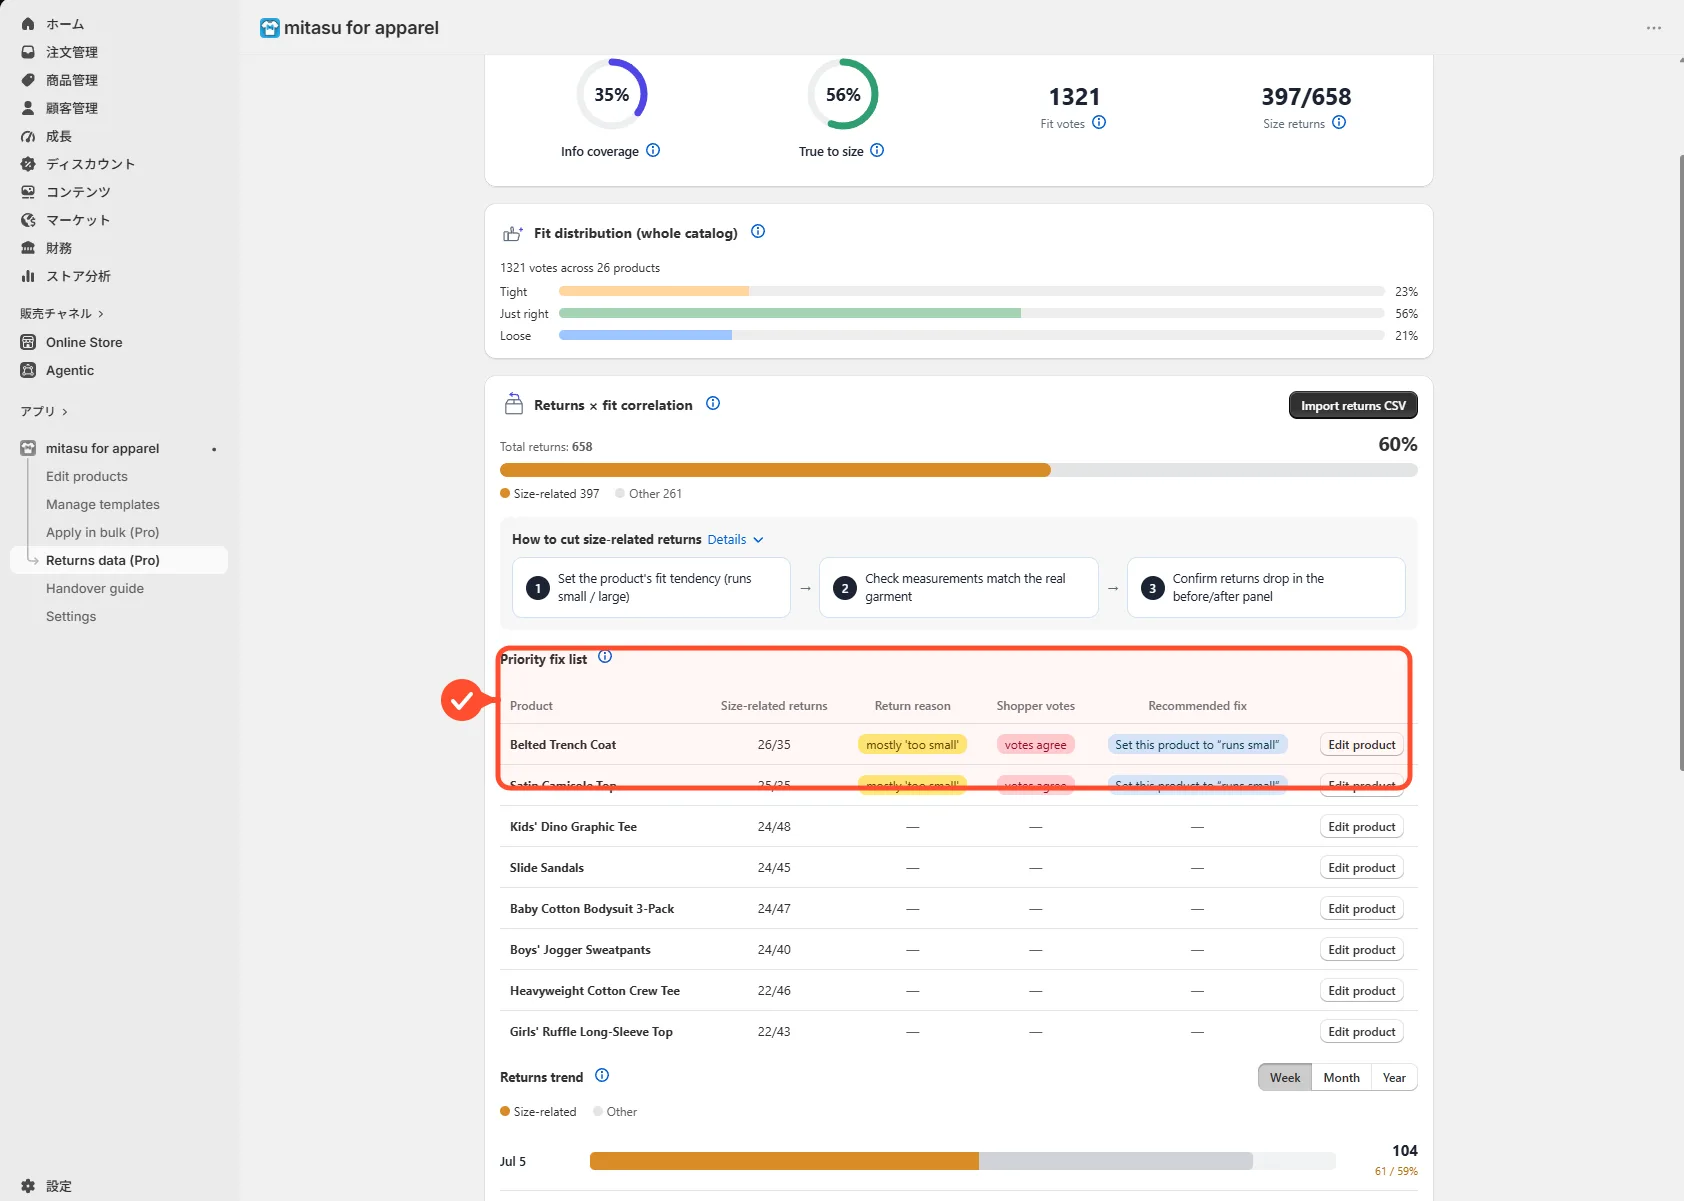
View the returns × fit correlation Pro
The Insights screen brings together the returns×fit correlation, a priority fix list ranking the products with the most size-related returns, and the returns trend. The returns×fit correlation and the priority fix list are both based on the most recent 90 days of data.
The returns trend chart isn't limited to those 90 days — it shows a longer history, and you can switch the view between week, month, and year.
Working down the priority fix list — revisiting fit tendency or adjusting a size chart — is the most effective way to bring returns down.
Settings
Where the app-wide settings live — the default unit, which sections appear on the storefront and in what order, and multilingual support.
Default unit
The unit you enter size-chart values in is controlled by Settings → Default unit. It's chosen automatically from the store's country (inch for US stores, cm elsewhere by default), and you can change it here at any time. Whichever you choose, the saved values are always stored internally in cm.
Set which sections show, and in what order
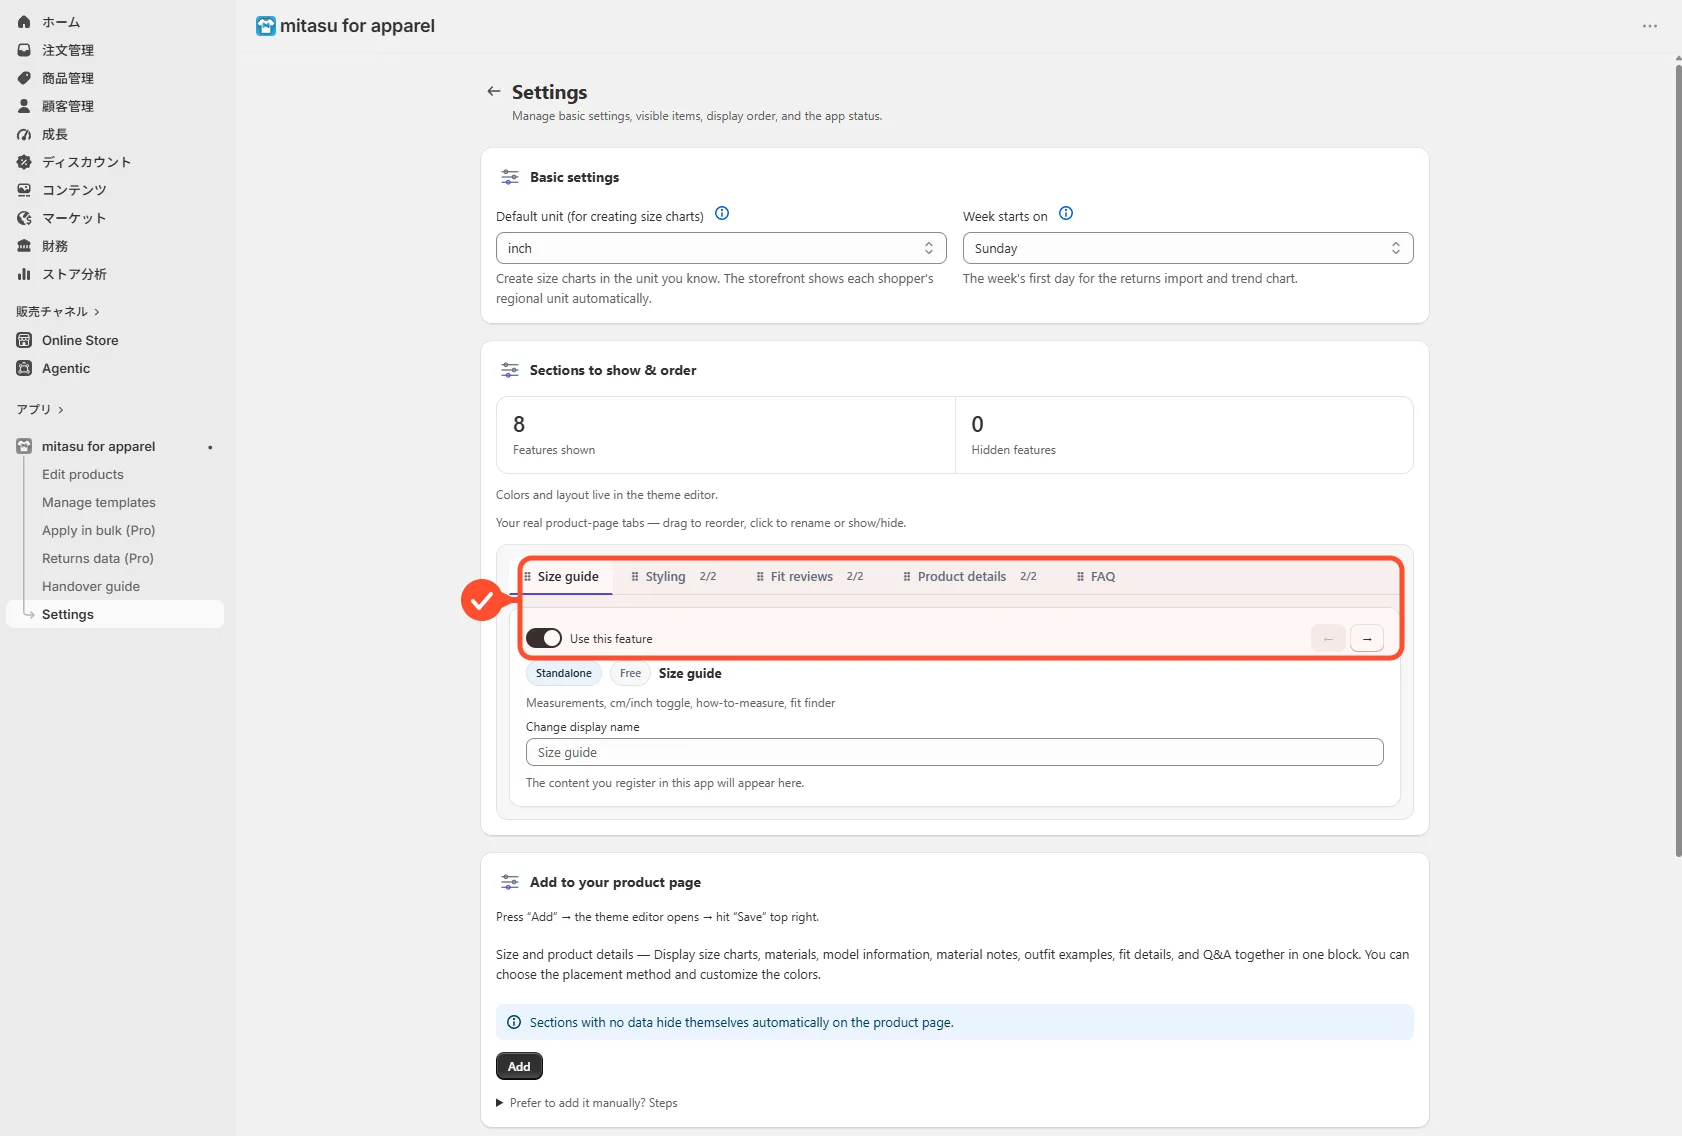
"Sections to show & order" lets you drag to reorder the app's sections on the product page, toggle each one on or off, and rename its heading.
- Open Settings and choose "Sections to show & order."
- Drag to change the order of the sections.
- Turn off any sections you don't use, rename headings as needed, and save.
Multilingual support (Translate & Adapt)
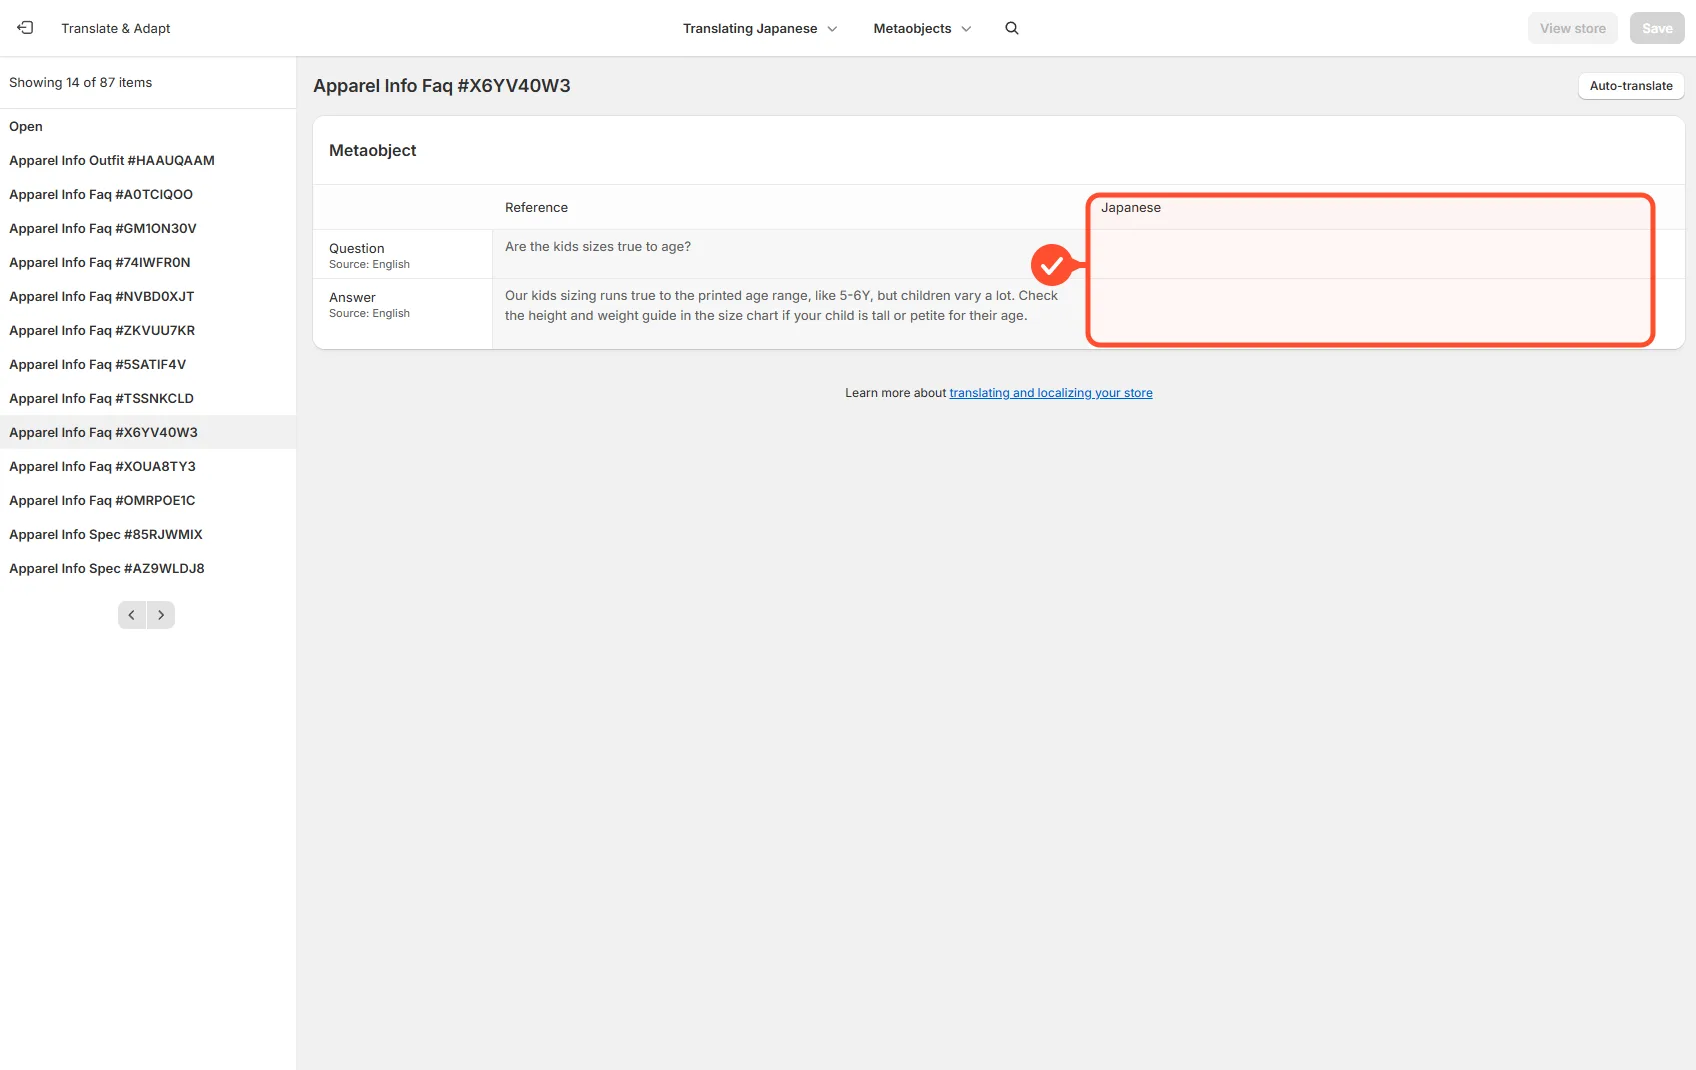
To translate text such as size charts, models, material notes, outfits, and Q&A into other languages, use Shopify's standard Translate & Adapt app. The app doesn't have its own translation screen — Translate & Adapt is the single hub for this. Once translated, the storefront automatically shows the right language to each shopper.
CSV, data & handover
Export or import your size charts and template assignments in bulk by CSV, hand routine work to a connected AI assistant, or generate a one-page handover guide.
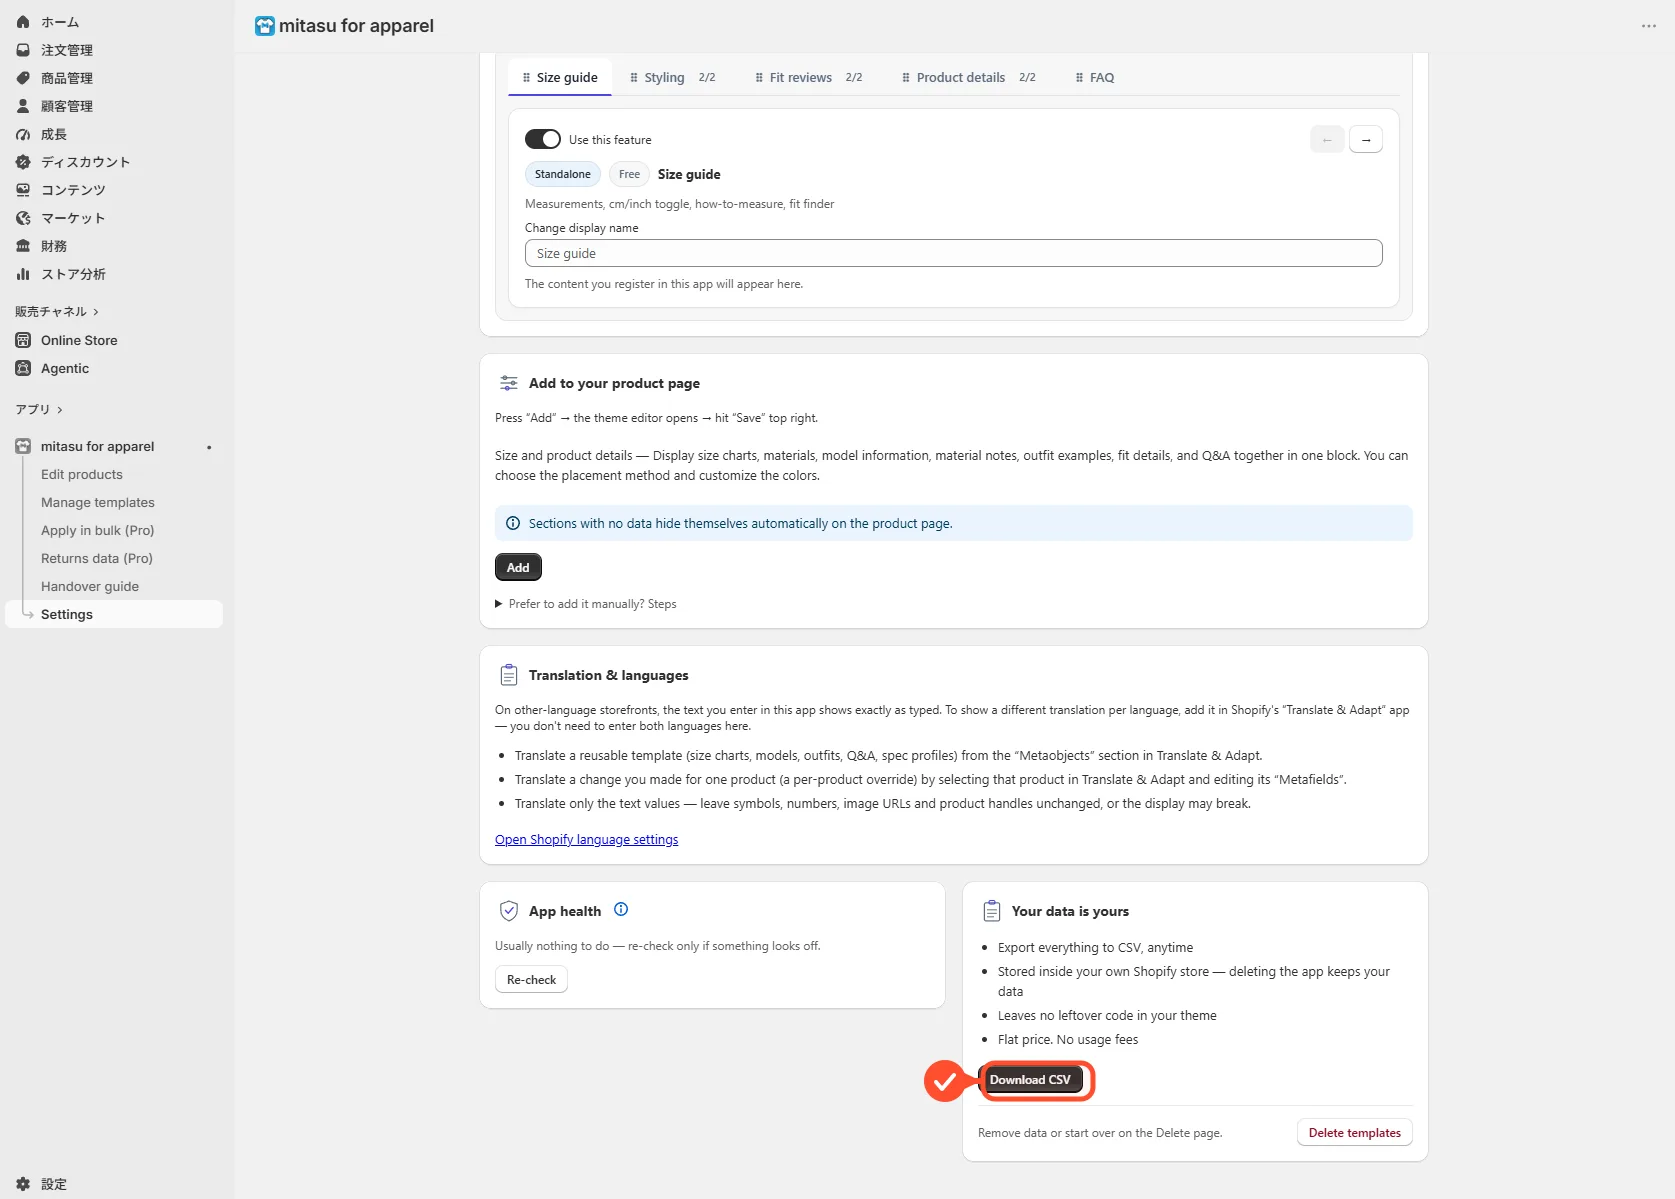
Export your data as CSV Free
Export everything you've registered as a CSV file. The columns are title, handle, size_chart, spec, outfits, models, faq; references to size charts, material notes, outfits, models, and Q&A are handled by name, so re-importing the file links everything back up correctly (a round trip).
Product attributes (materials, care, etc.) are Shopify-standard fields, so they are not included in this CSV.
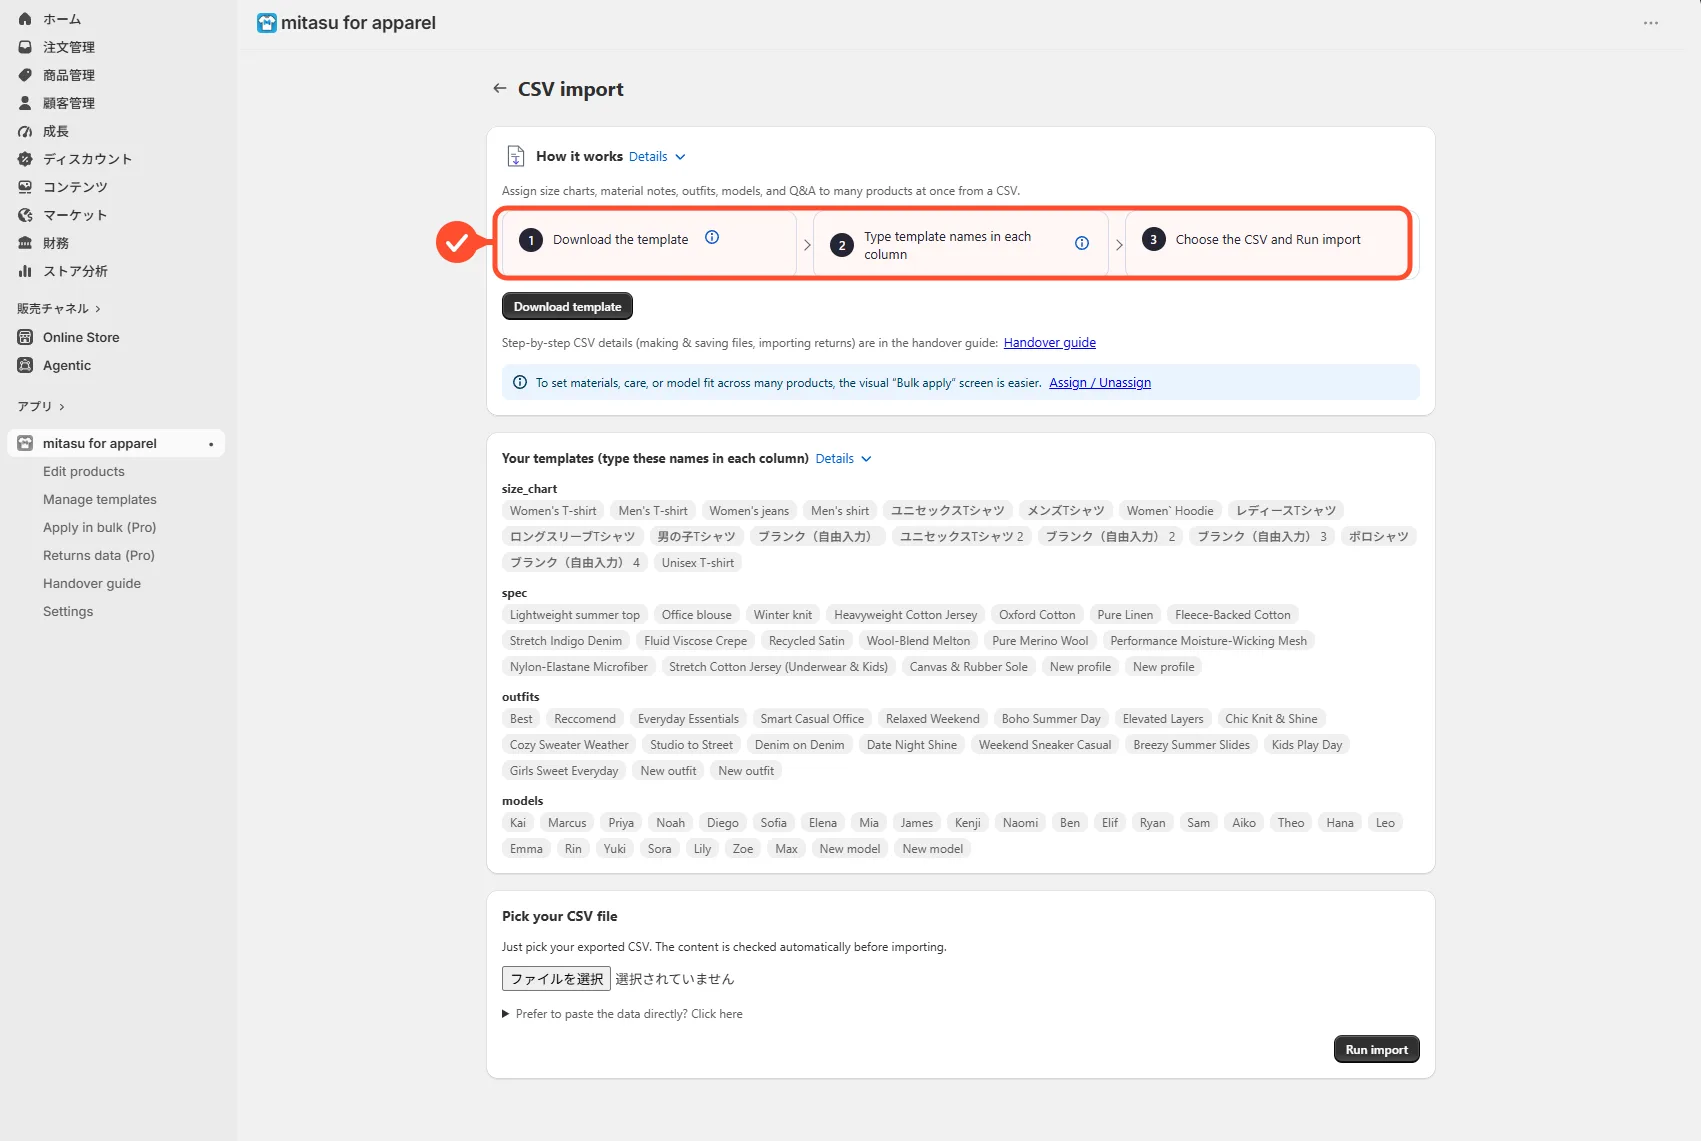
Import content by CSV Pro
Bring in size charts and template assignments in bulk from a CSV file. The content is checked automatically before it's applied, so a wrong column name or an invalid value is caught before anything changes.
Let a connected AI assistant help
Because all of your data lives in your Shopify store's standard storage, an AI assistant connected to your store — Claude and others — can help create templates and assign them to products. For bulk changes, the app's own CSV export/import flow does the work, so large changes are checked and applied safely.
See the AI operations guide for the full walkthrough.
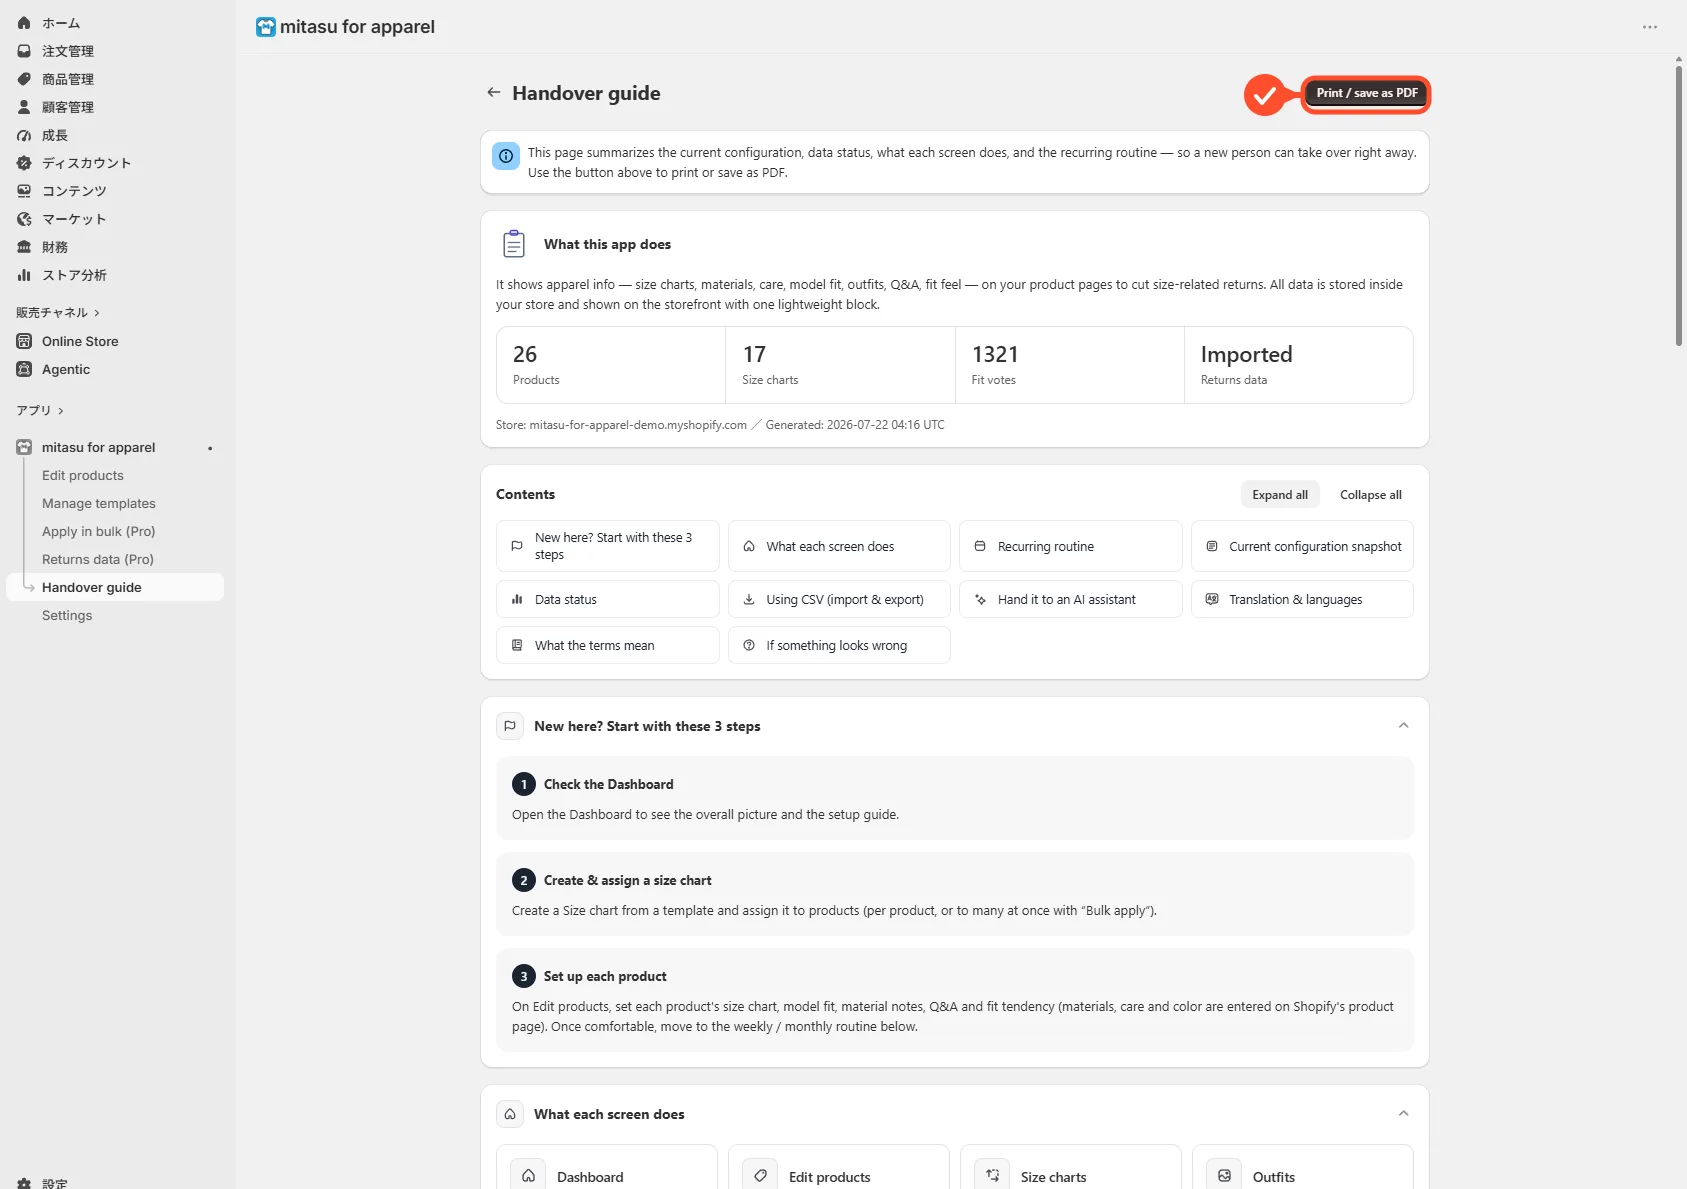
Generate the handover guide
The handover guide gathers your current settings, data status, what each screen does, and the day-to-day routine onto a single page. When someone new takes over, print this page or save it as a PDF and it doubles as your handover document.
What shoppers see
How the app looks to shoppers, on the product page and on mobile.
How it looks on the product page
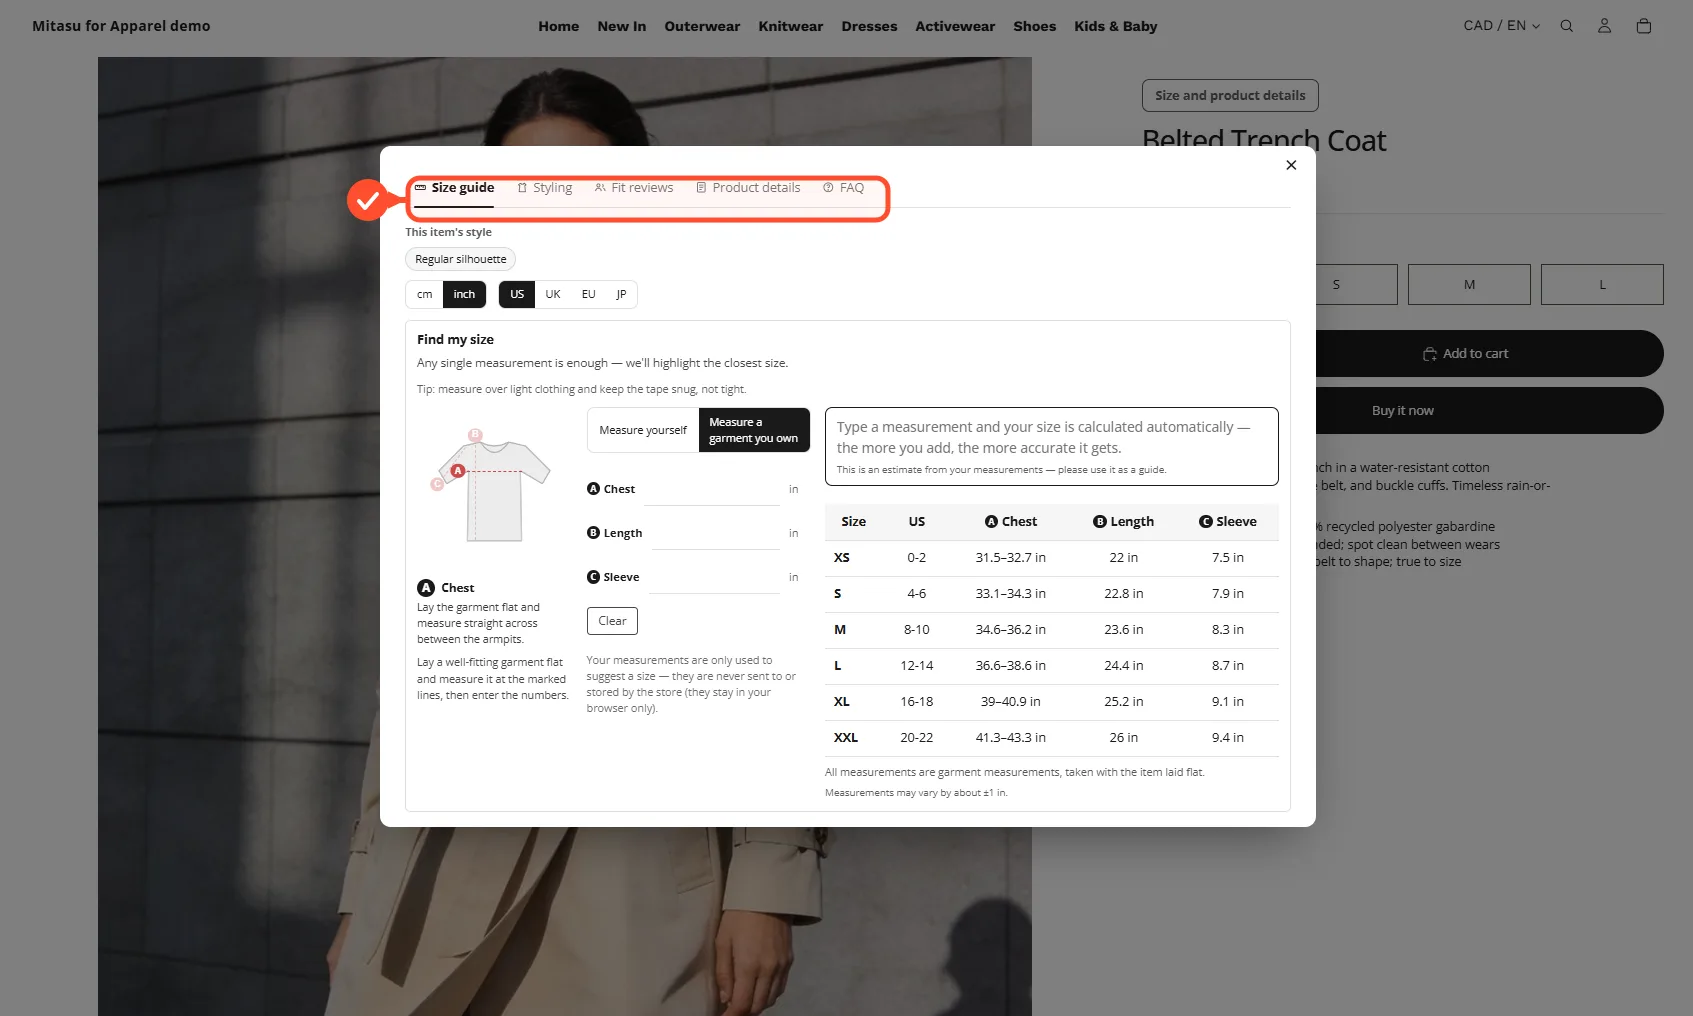
The sections (size chart, materials, model info, outfits, Q&A, and so on) appear together as a single block on the product page. You choose how it's shown in the block's settings:
- Placement: inline on the product page, or as a modal (popup) that opens from a button — a modal keeps the page from getting long (the image below shows it opened as a modal).
- Layout: switch sections with tabs, or stack them vertically.
- Colors: automatically match your store's brand colors.
Any section with no data is hidden automatically on the product page.
How it looks on mobile
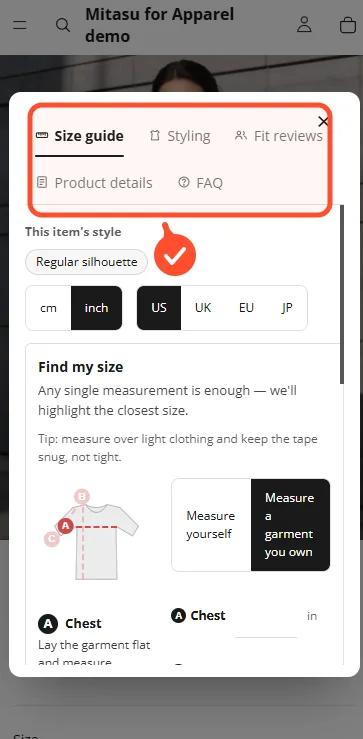
The same content shows the same way on a smartphone. The measurement figure opens as a tappable popup, and fit voting works with a single tap. The layout adjusts automatically to the screen width, so there's nothing extra to configure for mobile.
Troubleshooting
What to do if something looks wrong, if the block doesn't appear, or if you're still stuck.
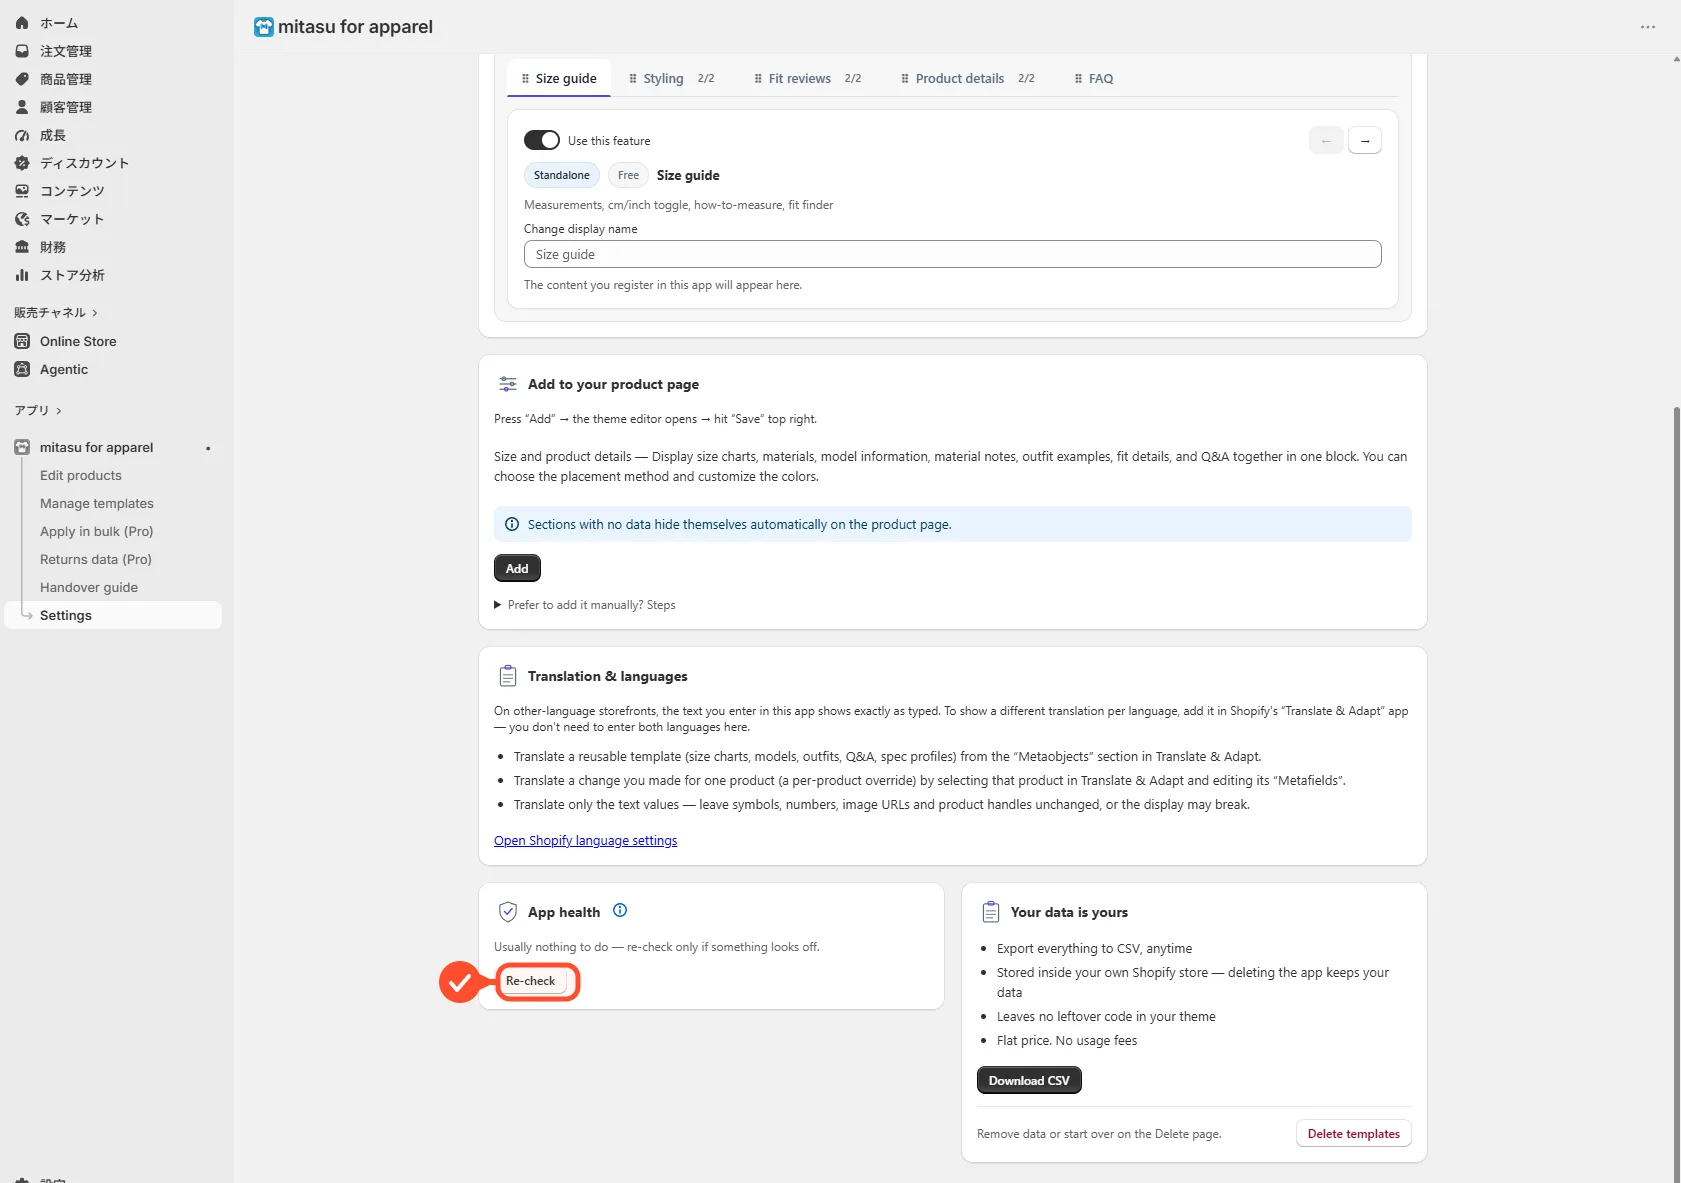
Use Re-check to verify status
Running Settings → Re-check verifies the app's status and automatically repairs anything that's missing. If a product page ever looks off, this is the first thing to try.
If the block doesn't appear on the storefront
If the block doesn't show up on the storefront, check these three things in order.
- The block is placed on the product page in the theme editor.
- The feature is turned on in Settings.
- A template (such as a size chart) is assigned to that product.